What are security headers: Updated for 2022
Hello again, my name is Jeff. Today, let’s break some codes. Today we are going to talk about Security Headers. What are Security Headers and why are they so important for websites and applications?
Before we start talking about browser support and how to set HTTP Security Headers, let’s understand what are Security Headers and how they work.
What are HTTP Security Headers?
Security Headers are a sub-set of HTTP Headers. They are exchanged between browsers and web servers to identify security related details of all HTTP communications. There are different types of HTTP Headers although not all of them are directly related to privacy.
This may sound weird for the non-tech or newbies, but you really don’t need to understand all these high-level Security settings in other for you to set them up. We have got your back and will walk you through how to set them up and protect your App or website from hijacking and other attacks.
Setting up or enabling HTTP Security Headers for your Application or website is the best way to protect yourself from hijacking, cross-site scripting, hacking and many common attacks.
How to set HTTP Headers for a website
Unlike SEO(Search Engine Optimization); when it comes to setting HTTP Headers, the structure of your website is not important. All we want is to protect the files and the entire website. It doesn’t matter how you structure your website.
There are many different ways to enable HTTP Headers. You can use a plugin, but I’m going to show you how to configure it in your .htaccess file because I personally don’t like plugins as they can slow down the speed of websites. You can use the plugin if you prefer.
Before you attempt the settings, you should first test your website to see if the HTTP Headers are missing. Here is a free website for testing HTTP Security Header. Once you’re on the securityheaders.com, simply enter your website URL into the search box and click ‘scan‘. Waite for a few seconds for the scan to complete.
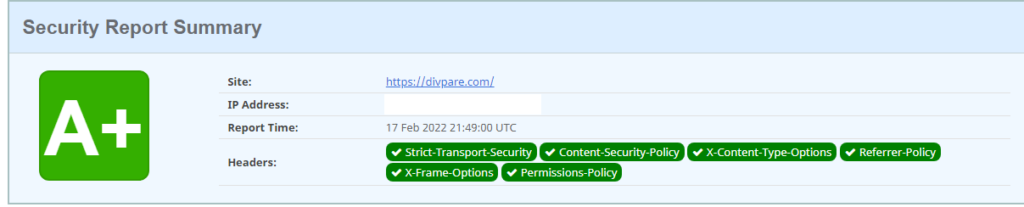
If you see a green background with good scan results like the image above, then you’re in a good state and you don’t need to do anything. This means that all HTTP Headers are enabled and working perfectly. Scammers and hackers hate it!.
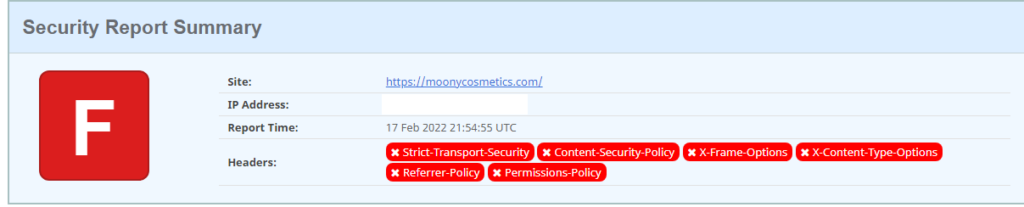
However, if you see a red background with ‘F‘ or a yellow background with ‘C‘, then you should take action asap to protect your website from the bad guys. Generally, F with red background means all your HTTP Headers are missing or they are not properly configured.
If your HTTP Headers are partially configured, the test results should show a Yellow or Orange background with a grade letter usually from B to E. A fully protected website like this should test A or A+

Types of HTTP Security Headers
Now that we know What are security headers, let’s explore the types of them and see which Headers are needed for your website and how to set them the right way.
If you take a look at the securityheaders.com test, you will notice that they have listed six different types of Headers. These are the very important HTTP Security Headers and must be set for every website. Let’s go through each of them and learn how to set them up.
1. Content-Security-Policy
One of the must-have HTTP Header for every website is the Content-Security-Policy (CSP) for short.
With the Content-Security-Policy Header, you have a full control on which resources a browser is allowed to load for your pages. What this means is that, if you take user inputs from your website through search box, Chatbot, forms or any type of inputs, an attacker can inject malicious script codes through those inputs.
Content-Security-Policy Header can block any source of JavaScript codes, CSS or any external codes coming from a different source. You can Wishlist or add a list of trusted domains that you want to allow scripts from.
Header always set Content-Security-Policy "upgrade-insecure-requests"
The default setting is default-src ‘self’, which means all resources should only be loaded from the current(your domain). However, you can add more directives to control different resources of your website.
Let’s add a header to block all external scripts and only allow scripts from our domain.
Header always set Content-Security-Policy: script-src 'self'
The above Security Policy will only allow scripts from the local or the current domain. This means an attacker won’t be able to inject any external scripts or JavaScript code into our website. What if you use google fonts and want to allow scripts from Google?
To allow scripts from a specific domain, you can add that domain to the header. See the code below.
Header always set Content-Security-Policy: script-src 'self' https://www.codepare.com
In the above Security Policy, we are set to only allow scripts from our own domain(self) and scripts that comes from https://www.codepare.com
There are other directives for style-src, img-src, plugin-types or object-src
Header always set Content-Security-Policy: style-src 'self'
Header always set Content-Security-Policy: img-src  'self'
Header always set Content-Security-Policy: object-src 'self'
!
Remember that any Policy set to ‘self’ will block all external resources. If you need to load images, scripts or any other files from a third-party domain, you should always specify those URLs as well. Example: Header always set Content-Security-Policy: style-src ‘self’ https://shareinfoblog.com will allow CSS from my current domain and any CSS coming from shareinfoblog.com
2. Strict-Transport-Security
One of the most important HTTP Headers is the Strict-Transport-Security. It is used to ensure that all connections between the web server and the browser is always encrypted with HTTPS instead of plain-text HTTP.
Add the code below into your website .htaccess file (Watch the video above for guide)
Header always set Strict-Transport-Security: max-age=63072000; includeSubDomains; preload
Now let’s explain what the above code do. When a visitor try to access your website, the code above informs the user’s browser that your website and all its subdomains are protected with a HTTPS. So what is the max-age=63072000 ? It is used to specify how long your website is protected. The number value is in seconds and you can set any number you like.
You may notice a preload at the end of the code. This piece of code indicates that your website is present on a global list of HTTPS-only sites. This code can also help speed up your website loads especially when visited for the first time.
3. Referrer-Policy
What is the Referrer-Policy Header and what exactly does it do? It is used to tell web browsers or control if and which referrer information should be disclosed to the web server. It help prevent information leakage from URLs. This Header has many options and we are going to go through each of them.
1. Header always set Referrer-Policy: "no-referrer"  /*Do not send any referrer information*/

2. Header always set Referrer-Policy: "origin"  /* Send the origin without path or parameters */

3. Header always set Referrer-Policy: "origin-when-cross-origin" /* Send origin only when the destination is offsite */

4. Header always set Referrer-Policy: "same-origin" /* Send referrer when the destination is of same origin */
Consider using any one of the above options.
4. X-Frame-Options
This Header allow us to protect our website from attacker who may target our website HTML iframes. It is designed to protect and prevent web pages from being loaded into iframes. The setting is very simple with three options: deny, sameorigin or allow-from
Header always set X-Frame-Options: "deny"  /* Do not allow at all */
Header always set X-Frame-Options: "SAMEORIGIN" /* Only allow on same origin */
Header always set X-Frame-Options: "allow-from" /* Allow from specific URLs */
5. X-Content-Type-Options
Now here’s another powerful Security Header. It forces all web browsers to strictly comply or follow with the MIME types specified in the Content-Type Headers. But do we really need this Header? If you wish to protect your website against cross-site scripting attacks that abuse MIME sniffing, then this is one of the best Security Header.
This Header will block any attempt to upload a JavaScript file into your website with an image extension and keep your site free from similar cross-site-scripting attempts.
Header always set X-Content-Type-Options "nosniff"
6. Permissions-Policy
Permissions-Policy Headers allows you to have more control the browser features. You can control whether the page or browser has access to the user’s camera, microphone or speakers. This allows you to keep your users more private.
To allow camera access for the page on your domain, you need to specify the header as follow:
Header always set Permissions-Policy: "camera=(self)"
And if you would like to disallow camera access, specify the header as follow:
Header always set Permissions-Policy: "camera=()"
But you can specify more than one options in one line. To do so, separate your directives with a comma. It’s good to have all your directives on a single because this will keep your code very neat. But try to break them on multiple lines if they are too long because we don’t want to mess up with our code.
Header always set Permissions-Policy: "camera=(self), microphone()"
Conclusion
Great! Now that you know What are security headers and how to set them, you may have noticed that your website was missing some important security settings. Don’t worry; the bad guys didn’t know.
Must hosting companies like Namecheap has a very powerful security software that will automatically add and enable all these security header for your website. But if you are using a different hosting company that doesn’t take security very serious. then you have to manually add these settings yourself.

About Me
Hello! My name is Jeff! I’m a full-time blogger! And I must say I love every moment of it because sharing things is my game. With over seven years of experience in the blogging industry, I love to share my experience with the world and work closely with anyone who needs a guide.