How to Start blogging and make money in 2022

How to start blogging and make money
How to start blogging and make money.
Do you want to start a blog, but you’re not sure where to begin from?
Today I’m going to walk you through how to start blogging and make money. I will guide you from zero to launching a money making blog/website. Hello, I’m Jeff. I’ve been blogging for seven years now and I must say I love every moment of it.
I’ve been wanting to write this for ages because not a day goes past where I don’t get asked how to start blogging and make money in some way, I always get emails, tweets, saying I want to start a blog. How did you do it? Or where do I begin?
I posted my first blog in 2014. And just like you, it wasn’t easy for me at first. I have searched a lot for guidance on how to get started, but I couldn’t get an easy answer from one website.
To be honest, it was a time-consuming because I had to do a lot of research and talking to other bloggers. Despite all my effort in launching a successful money making blog, I made some mistakes along the line.
From picking a proper niche to choosing the best web hosting. I know the questions you may be asking yourself at this time because I started from where you are today.
To save you a lot of time, I gathered together this step-by-step blog tutorial to teach you as beginner how to start blogging and make money quickly and easily. This guide will help you avoid all the mistakes I did and also make your journey easier and lot quicker.
Why do you want to start your own blog?
You need to ask yourself why you want to start a blog. And you have to be very careful here about whichever answer you got because this answer has a great impact on your blogging journey.
As for me, I started blogging a few years ago and it was like a natural need to write. And I just love to share things with people.
I’ve heard many people say, I’m going to start a blog because I want to earn enough, so I can stop my current job within three months. Well, it doesn’t work like that, trust me.
Now before we start this guide, I want to make something clear here; blogging isn’t a get-rich-quick game. Scary, right? Blogging is like a business; You don’t expect to open a new company today and start making money from day one.
It will take some time before people start to find out or note about the existence of your company. Just bear that mind.
How much does it cost to start a blog?
divpare.com is a free resource that is 100% supported by readers.
Prices vary. With Bluehost, you could get a hosting plan for as low as $142 for three years or $71 for a year.
And if you’re looking for even a cheaper hosting company, then join me at Namecheap!. You can host 3 websites for one year at only $21. When starting a blog or any website, you always want to have a good foundation. I highly recommend you choose their unlimited web hosting which is only $35 per year. And if you want to save even big, go for a two year straight at $64.
Because we’re Affiliate Partner with most hosting providers, you can get your hosting plan for cheaper than anywhere else!
Plus a free guide on how to start a blog the right way. We will help you configure and install all the necessary plugins on your blog for free if you register through us.
We will also show you how to customize your blog and give it the best design for free. Buy your hosting service and let’s guide you for free.
There are a few blogging platforms out there where you can simply create and run a blog for 100% free. However, let’s get something straight here; nothing good actually comes free online.
You’re either paying for the product or service in a different way or you’re the product. You want a blog that you can have a total control over it and not a blog that is overwhelmed of unnecessary Ads.
Most of the free hosting platforms are not properly maintained so the security and the load speed can be significantly lower compared to paid hosting companies.
How to start blogging and make money in 8 steps.
Jump to any section by clicking on the list
- 1. Select a perfect niche for your blog
- 2. Choose a blogging platform
- 3. Register your domain name
- 4. Sign up for a web hosting account
- 5. Setting up your blog on WordPress
- 6. Choosing a theme and customizing it.
- 7. Write and publish your first blog
- 8. Optimize your blog content for SEO
- 9.Advance blog customization
- 10. Making Money From Your Blog
Here’s how to start blogging and make money
1. Select a perfect niche for your blog
A niche is the unique topic of your blog. You want to go for something you’re most interested in. You also want to make sure that your niche has enough audience interest.
Once you decide a niche, it’s time to think about the level of difficulties or challenges you may face along the line. How many people are already in that similar niche or who are your competitors and how difficult will it be to compete with them.
Think about how big is your niche. Are you just going to be promoting a single product or different types of services. It’s also very important to Analyze monetization potential.
2. Choose a blogging platform
When it comes to choosing blogging platforms, you have a few options. As I already mentioned, there are several blogging platforms that allow you to start your own blog for free.
To be honest, I have never been tempted to start a blog on any of these free platforms, so I won’t talk about them in this article.
If you want total control over your blog, or plan to run ads, sell products and services via your blog, then your best option is to go for a Self-hosted blog solution like WordPress.org.
With this, you can set up your blog and run it using your own domain and web hosting. You will have a full control over your blog and its contents. You will be charged a few dollars per month for web space or hosting and about ten dollars each year for your domain.
Bluehost offers free domain for one year when you sign up for a hosting account.
!
To make your blog using WordPress.org, you will need a domain name and a hosting account. Sign up here and get your free domain to continue.
If you need any help in setting up your hosting account, feel free to contact them for assistance. You can also contact us if there’s anything you would need to know. We’re ready to help!. >>>>> [email protected]
3. Register your domain name
A domain name is simply the name of your website or how you’re known online. It doesn’t matter what niche you choose; this will be your unique address on the Internet.
When people type your domain name into their web browser, they’re taken right to your website. Visitors are able to see your blog through search engines such as Google and Bing, so you definitely need to find a unique blog name.
There are so many domain name extensions like .com, .net, blog, .org and many more. It’s good to pick a .com extension as it’s the most popular and highly demanded.
A domain name is like renting an apartment; you can only stay in that apartment as long as you keep paying the renting. So once you stop paying, the owner of the building will kick you out and rent it for someone who is ready to take over.
You need to pay for your domain every year. If you fail to renew your domain after one year, you will be given extra few months to do so. After that time has passed, your domain will be released for people to register.
At this time, you can still register it. However, it’s impossible to get your domain back once someone else is fast enough to grab it.
So, it’s very important to always renew your domain few days before it gets expired. You can pay for about 3-4 years and have a peace of mind.
4. Sign up for a web hosting account
This is where most new beginners get things wrong. The functionality and performance of your site all depends on your hosting provider.
Your contents and files are stored on the server of your hosting provider so they have to make sure your blog is available 24/7 to potential readers.
x
If you choose the wrong hosting provider, you are going to face so many problems. There are a few factors to consider when choosing a hosting provider. You can read our full guide on how to choose a hosting provider
Bluehost is one of the best option for most successful blogging experts. They have all the necessary tools needed for a successful blog and very easy to navigate.
Why Bluehost?
✔
# 1 choice of blogging experts

Starting at $8.99 $2.95/month
- Free domain name
- 63% off regular price
- 30-day money-back guarantee
* Excellent Customer Service.
I’ve used Bluehost for many years and have never been disappointed. So why is Customer Service so important in web hosting?. When starting a journey online as a new beginner, so many things are likely to go wrong along the line.
And most of the time, your hosting provider is the go-to person. Sometimes you may find yourself working with different freelancers or web design companies, but a good customer service from your hosting provider is still important and I will tell you why.
Imagine you detected an issue on your website or someone hacked your website and gain access to your file. The first thing you want to do is to contact your hosting provider immediately.
How soon your hosting provider is able to respond to your desperate call or message will determine your chance of getting your website back without no or much damage to your files.
Bluehost understand all the needs of their customers so they’re always on their toes to help you throughout the entire process.
They have the lowest hold time of about 30 seconds and with over 18 years of experience, you can rest assured that the person helping with your site knows what he/she’s doing!.
* Free Domain.
When you sign up for hosting with Bluehost, you get a free domain name, which allows you to avoid the upfront and recurring fees associated with purchasing a domain on your own. If you’ve already got your own domain name, don’t worry; you can still use your domain with Bluehost!
* Money-Back Guarantee.
Bluehost offers a 30-day money-back guarantee, so there’s no risk if you change your mind.
* Great Pricing.
Bluehost is one of the best web hosting company with a great price that fits your budget.
5. Setting up your blog on WordPress
In this section I’m going to guide you through how to sign up for your hosting account. I will show you how to create a Bluehost account and start building your blog in a 7 simple steps.
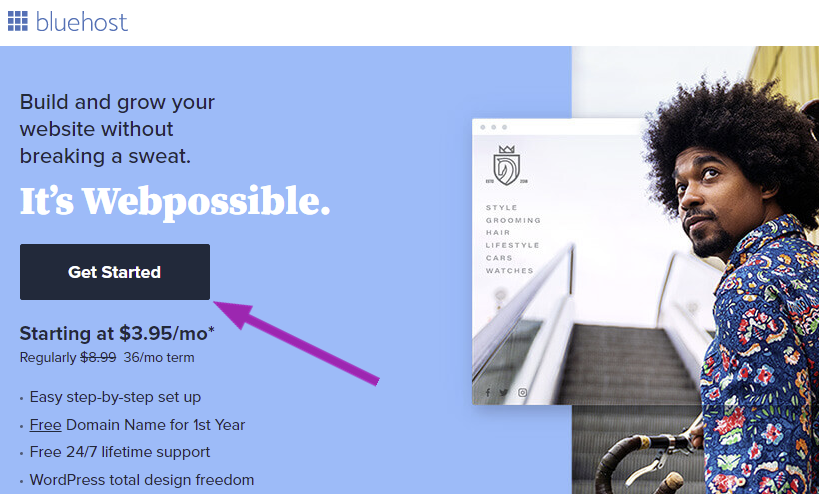
1. Visit the Bluehost homepage
Visit Bluehost.com and then click the “Get Started” button.
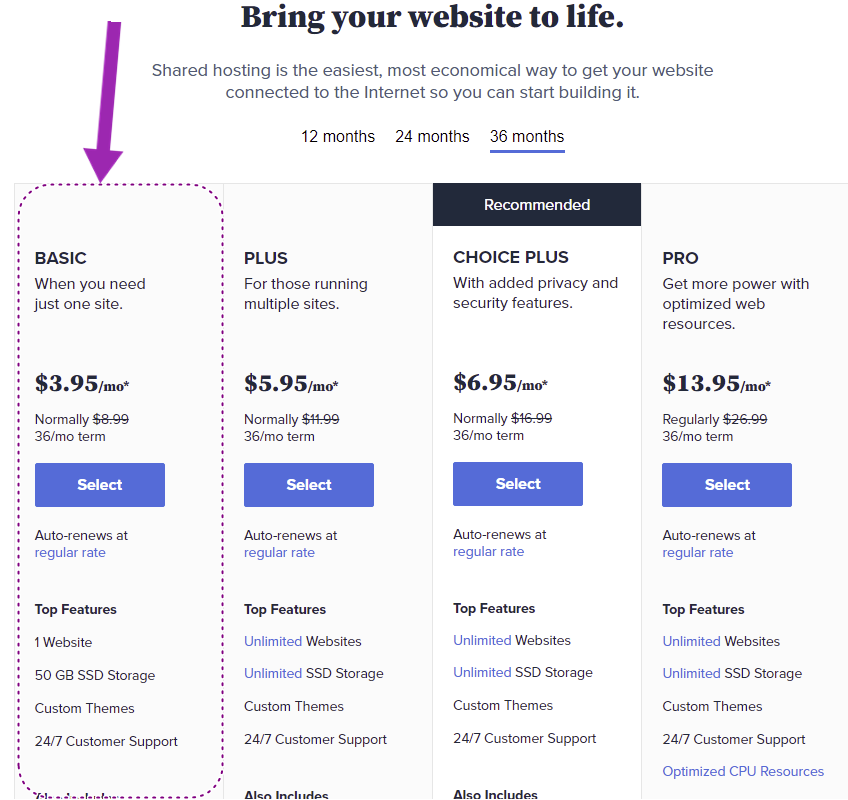
2. Select your hosting plan
Once you clicked on the “Get Started” button, you will be taken to a page or section that looks like the image below.
You have four different plans to choose from: BASIC, PLUS, CHOICE PLUS, and PRO.
While the PLUS, CHOICE PLUS, and PRO have more pro-services, I recommend you choose the BASIC plan if this is your first website. The BASIC plan also has everything you need to launch a successful blog or website and that is where we all started from.
You can choose 12 , 24 or 36 month plan; which ever your budget allows. You can easily upgrade to a Plus or Choice Plus plan once your blog starts growing.
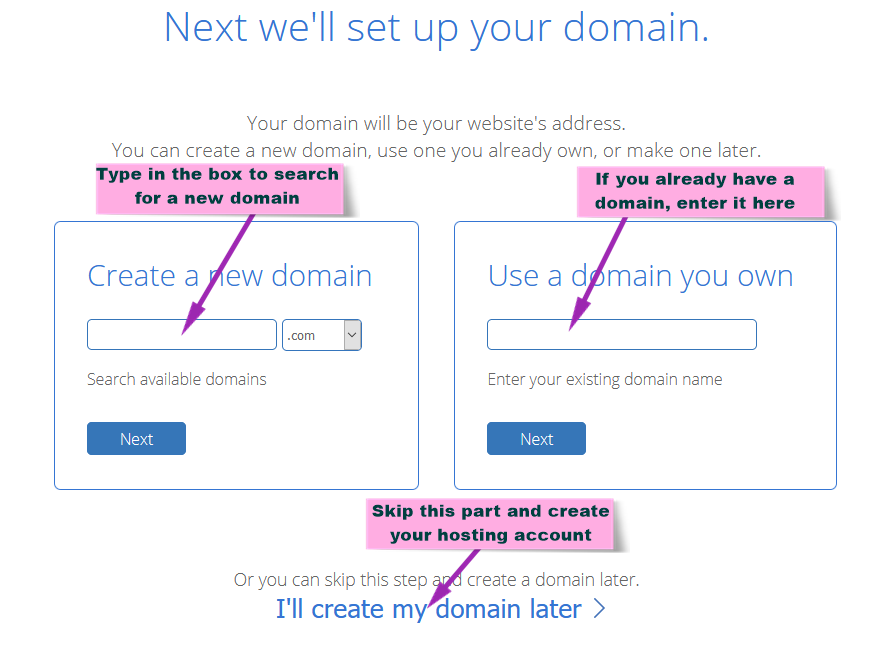
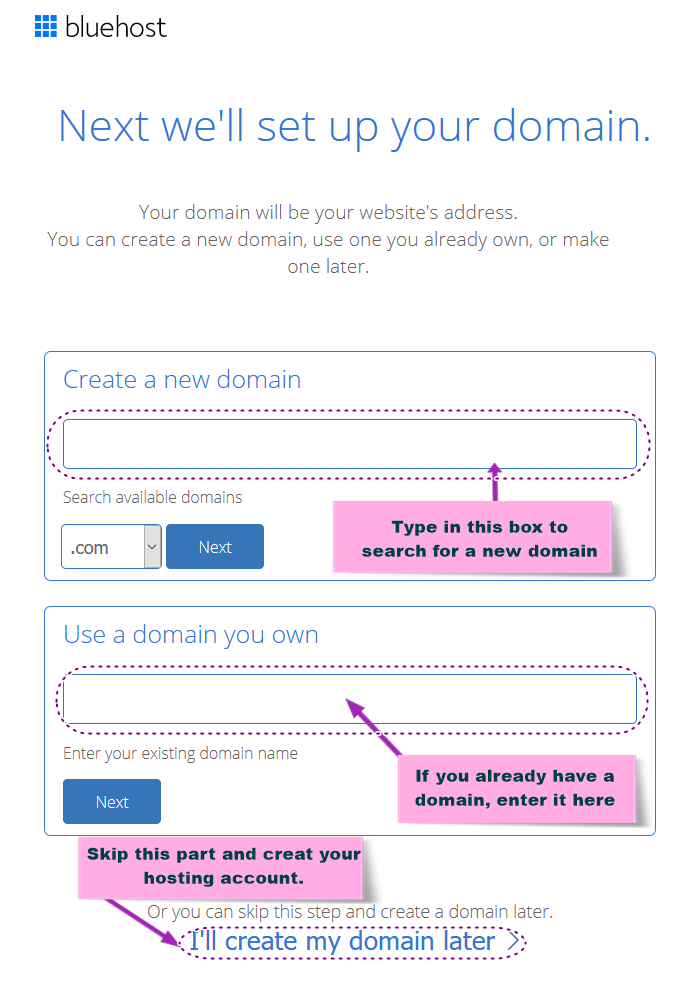
3. Set up your domain name
Your domain name is your blog’s address. Most of the time the desired domains are taken so it’s unlikely that you get your dream domain name. However, it’s okay! You can choose a different name.
In the “Create a new domain” box, simply type in a domain name. Bluehost will carefully check and search worldwide to see if the domain name you entered is still available.
Note that this step can be skipped if you’re not ready to choose your domain or if you want more time to decide which name to choose. Just proceed and scroll down, click “I’II create my domain later“.
If you already got a domain name, enter it in the “Use a domain you own“.
4. Create your hosting account with Bluehost
The next step is to create your hosting account. This is where all the files of your blog will be sitting, so it’s the most important part of your blog.
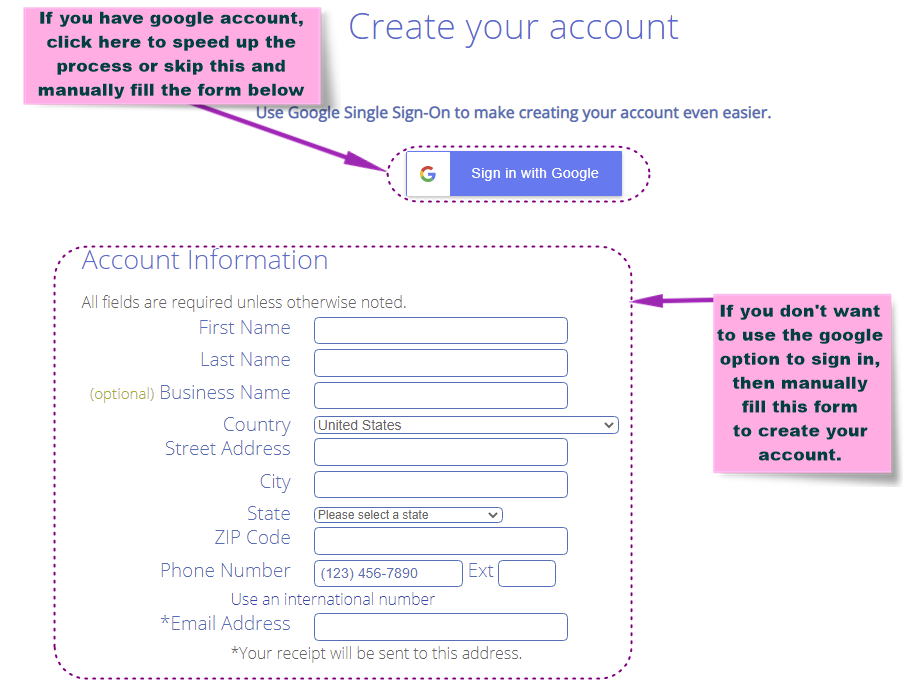
After you are done with the domain name section, you will be taken to a registration page where you can fill in your personal info.
The “Sign in with Google” will make the process even easier! So go ahead and click on that option if you have a google account and currently logged in on the same browser.
Add your account information
Select your hosting package
Bluehost offers 12, 24, and 36-month packages. Choose which package is best for you. Again, remember, we’re standing by; give us an email if there’s something you want to ask.
Or simply connect and chat with live on Skype: Ania Universe

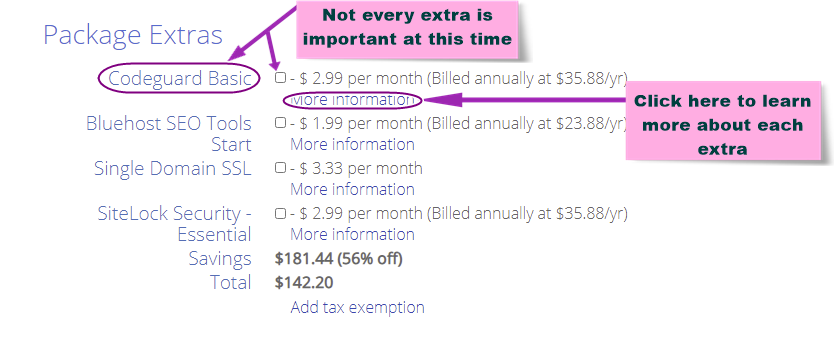
Package extras
Be sure to review your package extras carefully! By default, few extras are added to your package at a cost. However, not every extra is essential.
Your total amount owing will decrease if you uncheck the boxes of extras you don’t need.
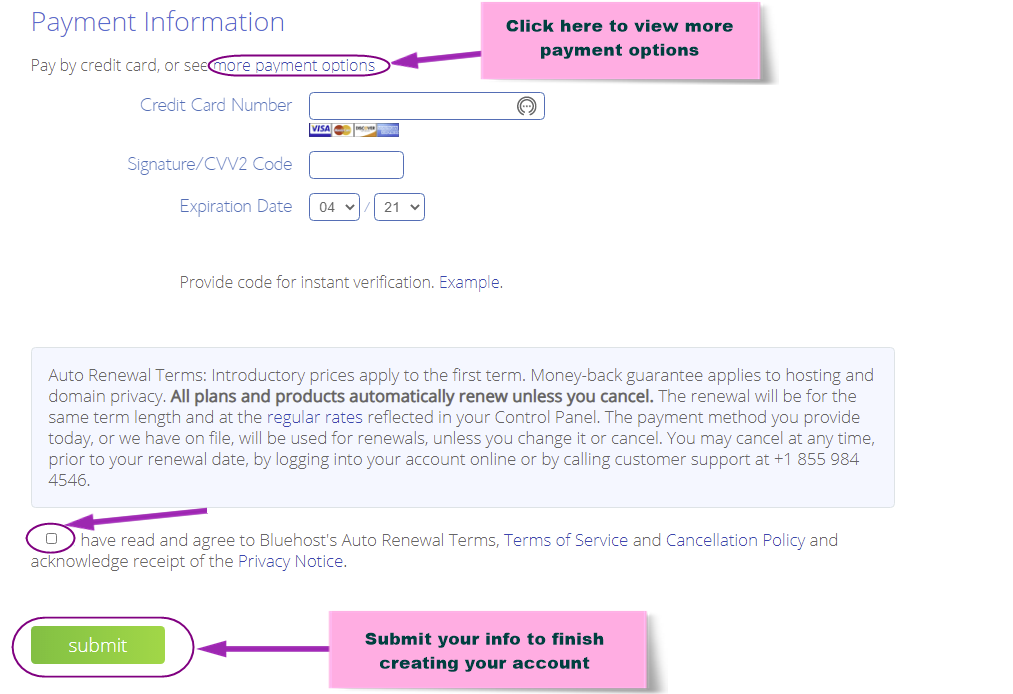
Payment information
At this final step for creating your hosting account, all that is needed is how you want to pay. There are several options that you can use to pay for your hosting account.
You can pay by credit card or by PayPal. To see more payment options, click on the “More payment options”.
Remember to read the TOS (Terms of Service) and agree by checking the box. Now click on the green “Submit” button.
If everything goes well, you will receive an email from Bluehost that contains a verification link. Simply open the email you received and verify your email address to activate your domain name. Next, you will set up your Bluehost account.
This is how to start blogging and make money; let’s keep going!
5. Finish creating your hosting account
This step is pretty simple; one of the emails you received right after you submit the form, has a link you should follow to create your account. All you need is a username and password for your account.
Following the instructions in the email you received,
Step 1. Click the “Create your account” button.
Step 2. Type in your password to complete the account set up.
Step 3. Your account is ready to go. Click the “Go to login” button.
Step 4. Enter your email or domain name and password to log in.
This is all that’s needed. It’s now time to start working on your blog. Let’s move on!
6. Create your WordPress blog with Bluehost
Once you are logged into your hosting account, you will find a four-step process to help you create a blog.
You can also click the “Skip this step” button and work on blog formation from scratch on your own, but I suggest you go with that procedure if this is your first time starting a blog.
Step 1: In the first step, all that is needed is the information about your blog. This will help them serve you better. However, you may skip this step.

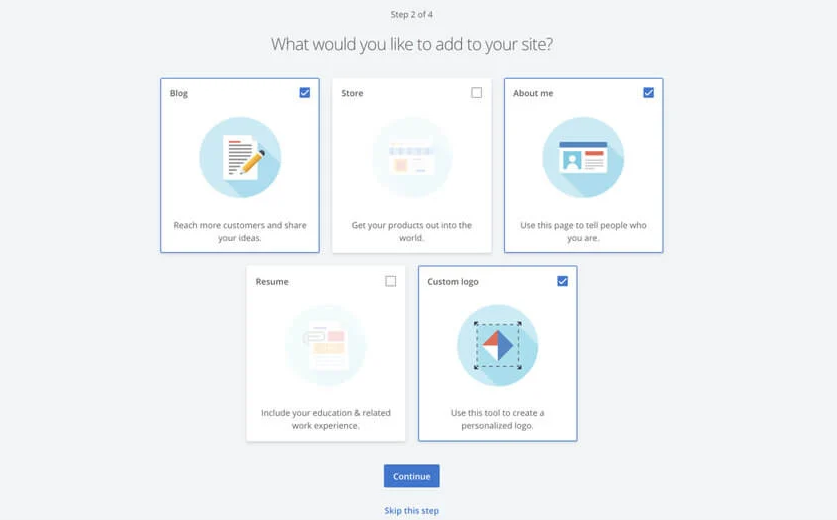
Step 2: Here, you can add few pre-made pages and templates for your blog. Later on, you can customize them the way you want.
For example, instead of creating an About page from scratch, you can easily add a pre-made About page and then later customize it with your own text, image and CSS when necessary.
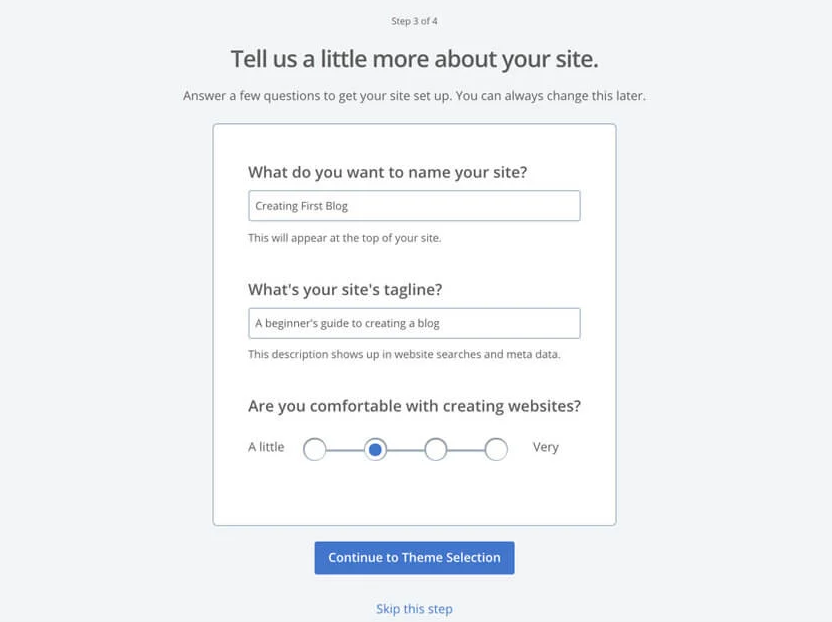
Step 3: Here, you need to answer some few questions like the name of your website, your tagline and your level of experience creating websites.
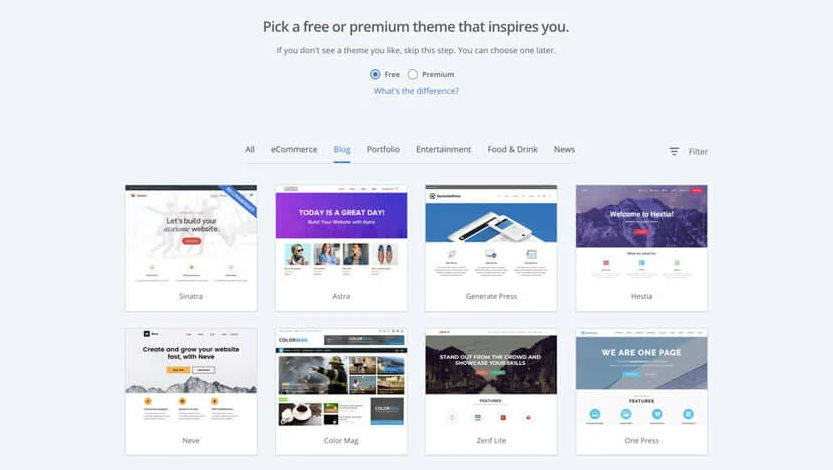
Step 4: Now choose a theme here. There are few free themes you can choose from. Themes represent the overall look, feel and style of your blog so choose the one you like most.
There are a bunch of free themes on WordPress so you can skip this step if you can’t find a theme of your choice.
7. Launch your blog
Once you complete the four steps, you will be taken to your Bluehost account. Also, note that the WordPress software is installed and your blog structure is set up!
To create your blog, look for “launch my Site” button and click it. A very ugly blog will open up; please don’t be scared, it’s your blog. At this early stage, your blog will look very awful, but don’t worry. This is where customization comes into play.
You just have to make some few changes, add content to make it look like a real blog. I will show you how to do that.
You can customize your blog and style it the way you want. If you need any help, feel free to chat with us on Skype: Ania Universe or drop us an email.
Let’s move on to the next step and polish your blog up.
6. Choose a theme and customize it.
Do you want a beautiful website? Here is where you can make your blog shine with combination of layouts and colors.
WordPress comes with free amazing themes and templates that makes creating a website very easy.
If you haven’t chosen a theme earlier, then let’s install one. However, a word of warning! The fact that these Plugins are free doesn’t mean you should install them anyhow. Having too many plugins on your blog could put you at risk. Be sure of what you’re installing.
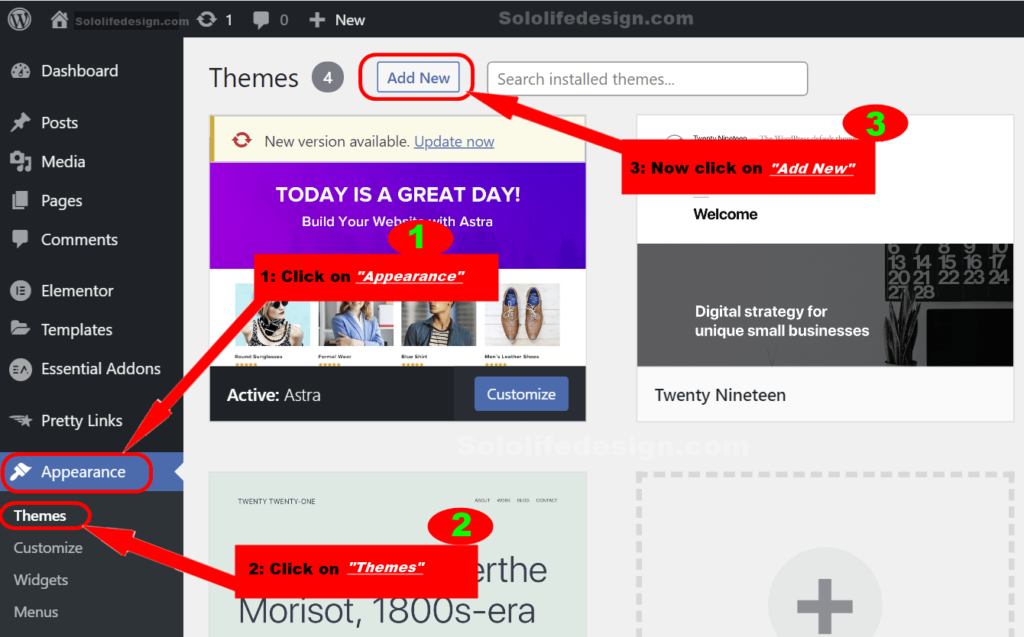
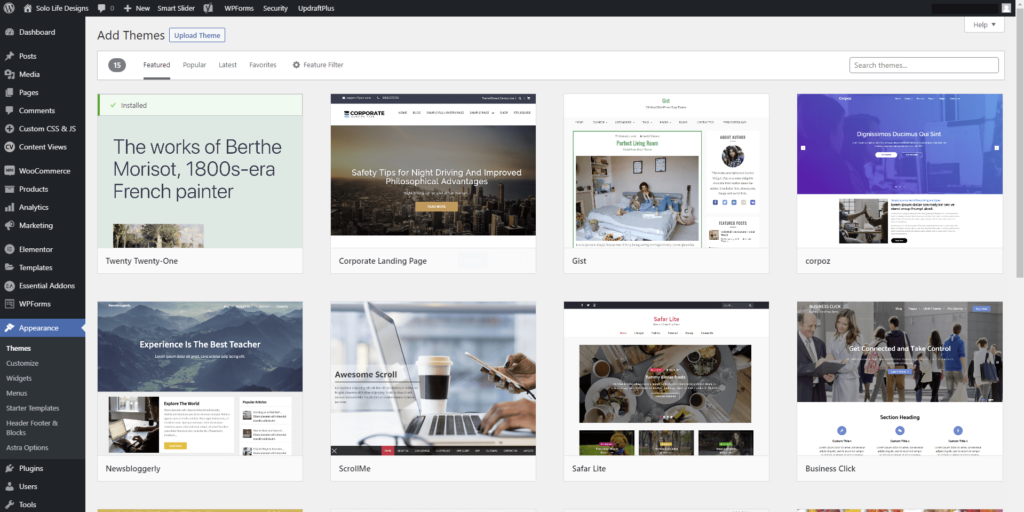
Here’s how to install a theme. Go to your WordPress dashboard. Click on “Appearance“. It looks like the image below. Hover or click on “Appearance“. In the drop down menu, look for “Themes” and click on it.
Now click on “Add New Theme“.
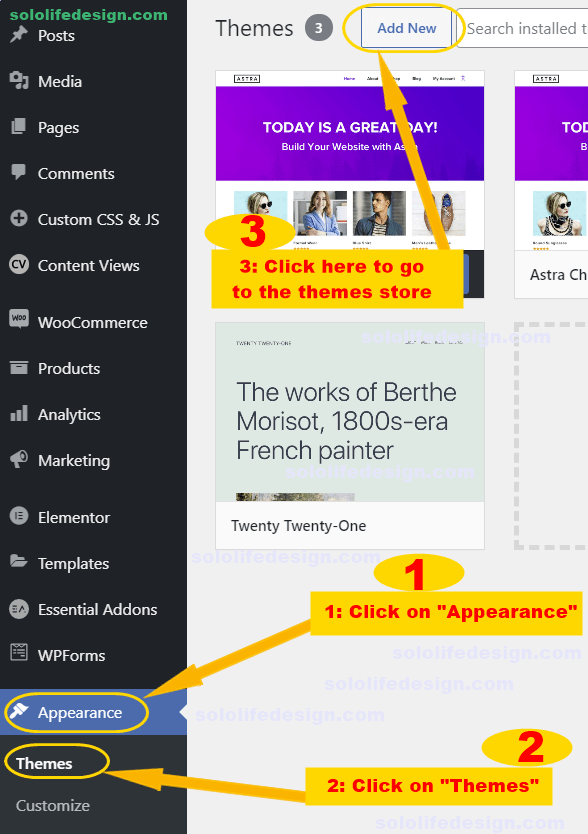
Your screen may look different from mine, but don’t worry, that’s because I have already installed some themes and plugins.
Once you click on “Add New Theme” you will be taken to the theme store. There are many free themes here to choose from and they’re very easy to customize.
Hover on any theme for more details. You don’t want to install any theme that doesn’t work for your specific needs. So make sure to read description, features and functionality of the theme you want to install.
Check the rating of the theme to see how many people are using it because this gives you a clear idea of how good the theme is.
Preview the theme to see the overall look, layout, and check if it’s good for your niche.
Should you choose a free or premium theme?
WordPress comes with so many free and paid themes. Both free and paid themes are from WordPress and can be used for any type of blog topic.
You can go with a free theme. Also, remember that you can always change a different theme later without ever loosening your content or pages; everything can be transferred to your new theme.
The free themes are completely fine for any blog, but if you want more advanced features, you can check the available premium themes.
Install Plugins
Plugins are pieces of software that contains functions. Plugins can extend functionality or add new features to a WordPress website or blog. You can create any blog or website super fast with the help of plugins without knowing coding.
The Plugin we’re going to install now is called YOAST SEO. Yoast SEO is a (SEO) search engine optimization plug-in for WordPress. This may seem confusing if you’re new to SEO, but it’s pretty simple
If you want your website to be found in search engines for particular keywords and phrases, you need to optimize your website. This process is called SEO. The YOAST SEO plugin will make the optimization easier. So let’s install it.
How to install WordPress plugins.
To install a Plugin, simply hover or click on “Plugins“. Now select “Add New” from the drop down menu.
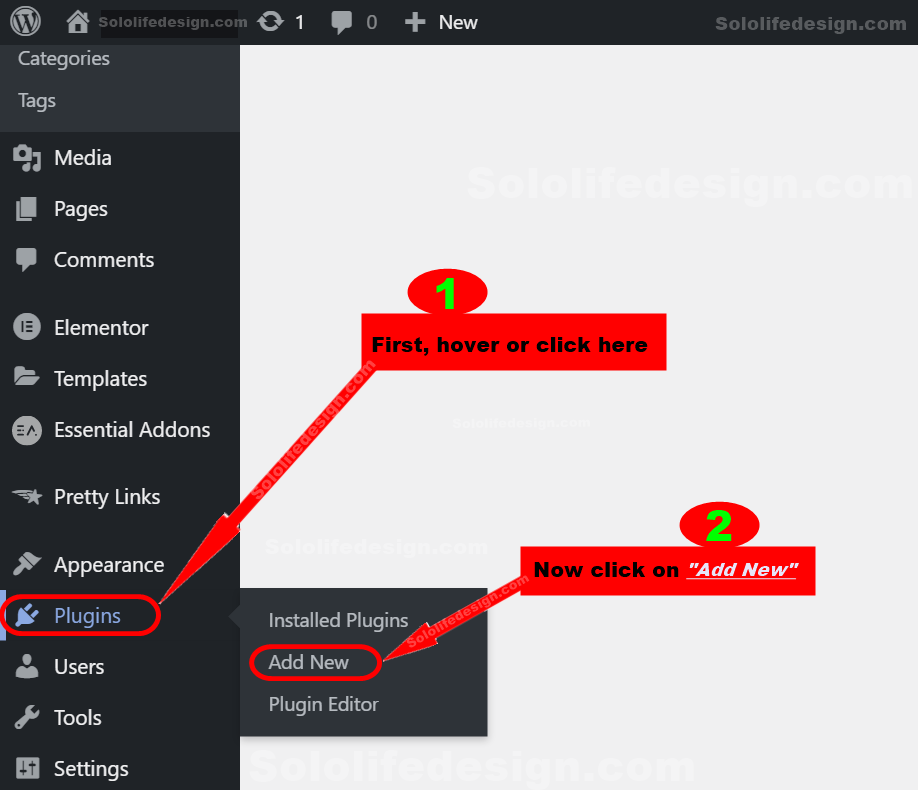
These two clicks will take you to the Plugin store. On the Plugins page, look at the top right side of the page.
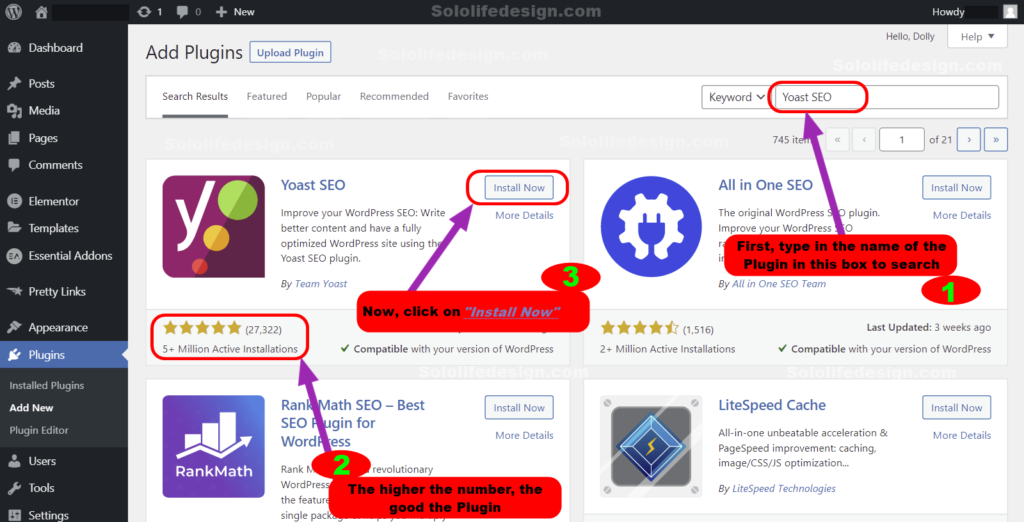
You will see a search box. Inside that search box, you can enter a name of any Plugin and hit “Enter” to search for it.
Once you see the Plugin you’re searching for, look under it to see if it has a good rating and how many active installations it has.
This will give you a clear overview of how best the Plugin is. If you’re satisfied with the rating of the Plugin, simply click on “Install Now” to install it.
It depends on your Internet speed, but it should take few seconds to finish the installation.
Once the installation is finished, you can activate it right away. You may also access the plugin through the Plugins setting. I will show you how.
How to activate a Plugin
Remember, you have to manually activate some Plugins before you can use them. So be sure to activate it and crosscheck to see if it needs any other configurations.
For the Yoast plugin, We need to go through some few more settings and configuration before the plugin can actually work. Let’s do that now, but wait… Where can we find the Plugin we just installed?
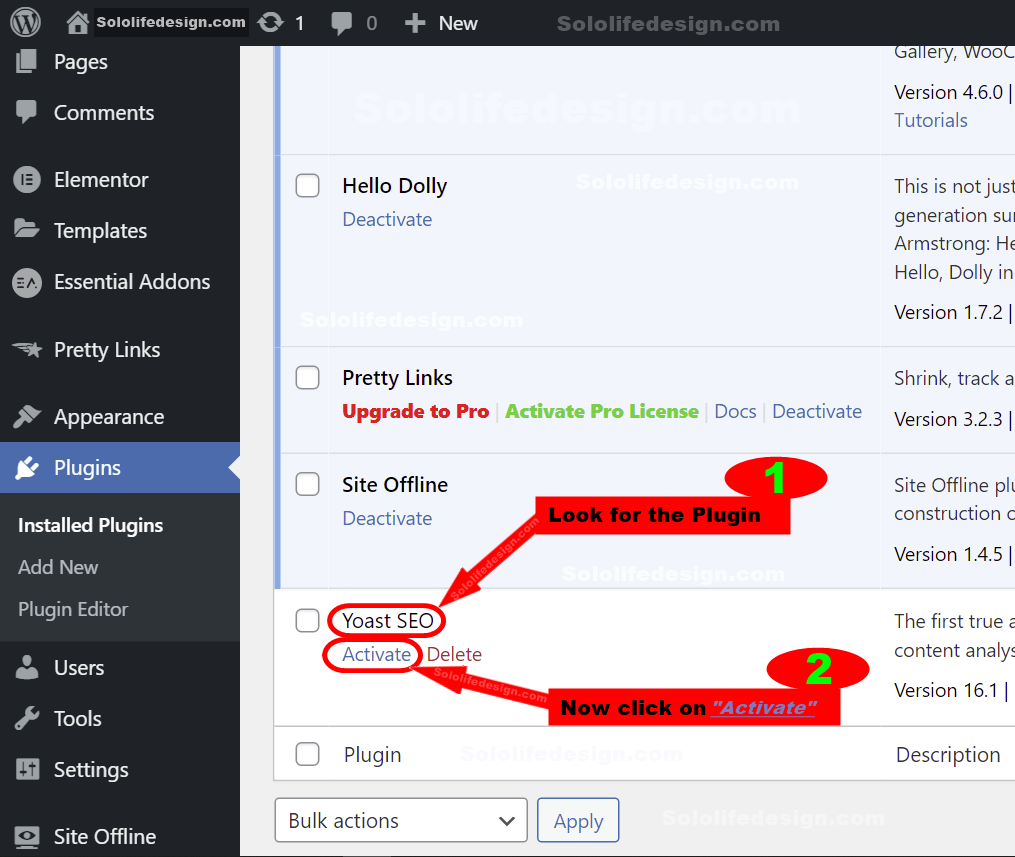
To see all installed Plugins on your WordPress site, hover or click on “Plugins” and click on the “Installed Plugins” from the drop down menu.
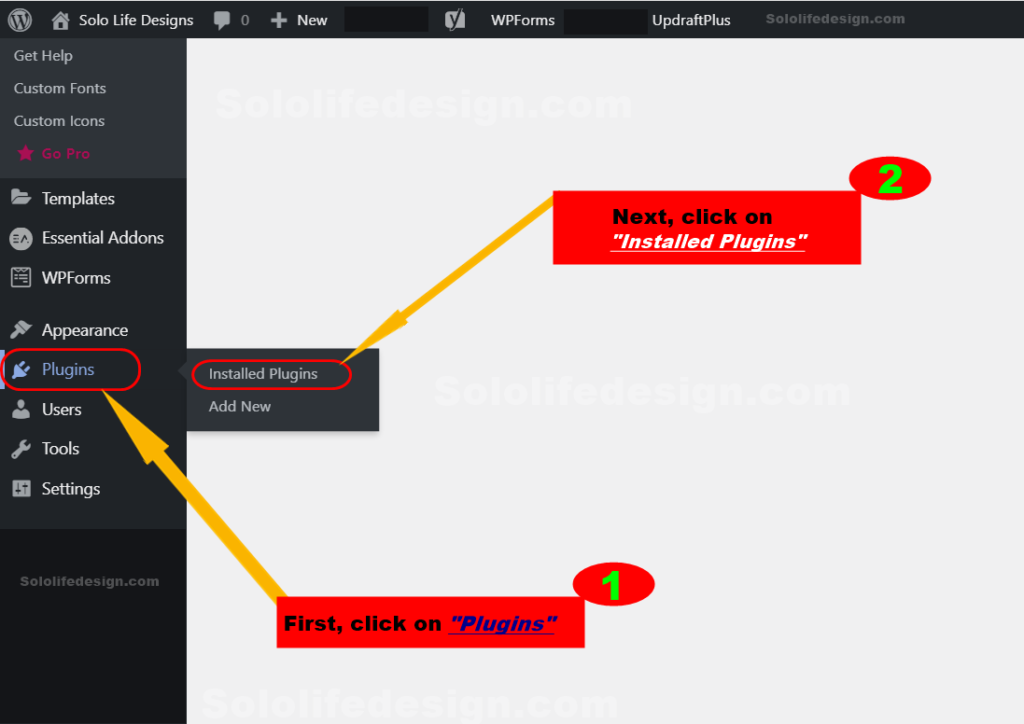
Once you click on “Installed Plugins“, you will be taken to where all your installed Plugins are. Here, you can see all Plugins that are installed on your blog.
Once you have found it, you will see “Activate” under it. Simply click on “Activate” to activate the Plugin. So let’s look for the Yoast SEO Plugin that we just installed; we need to activate and configure it.
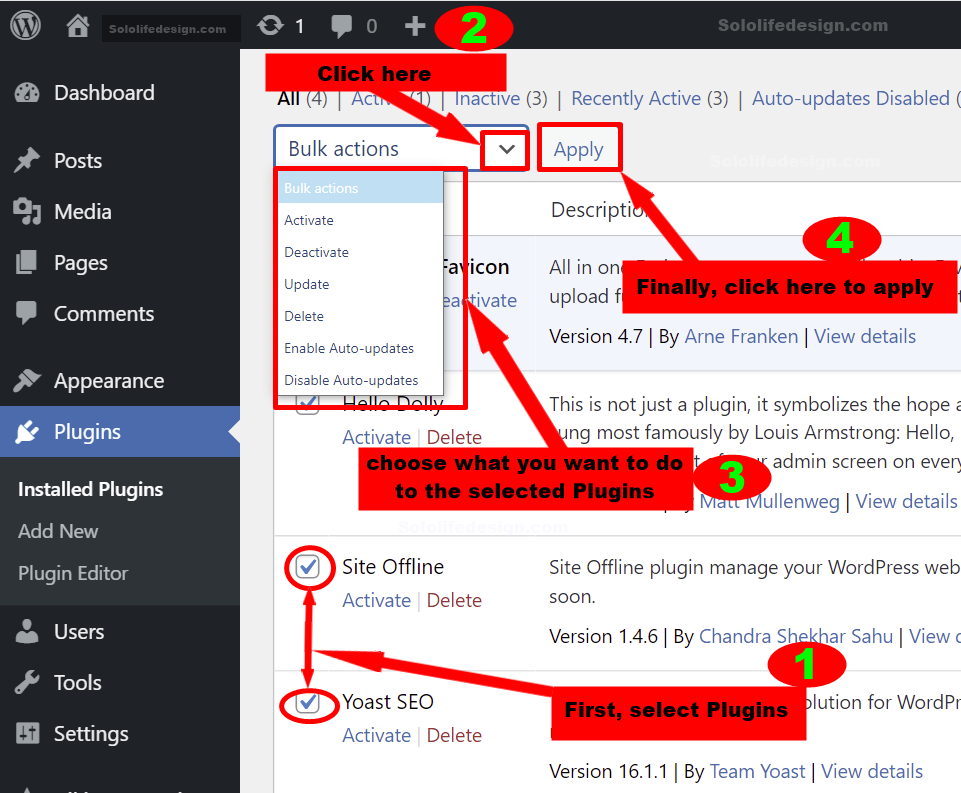
How to delete, activate or update multiple Plugins at once.
It is possible to perform one action on multiple Plugins at the same time in just three clicks.
To do this, go to your Plugins. Beside each Plugin is a little check-box you can click to check and uncheck each of them. Check all targeted Plugins and then at the top or bottom of the page, you will see “Bulk actions“.
Click on “Bulk actions” and choose what action you want to apply to all the selected Plugins. Finally, click on “Apply” to finish the action.
Most plugins can be found on your sidebar so you don’t have to navigate to the Plugins page. You can access plugin’s settings from the menu in the sidebar or by clicking on the icon at the top.
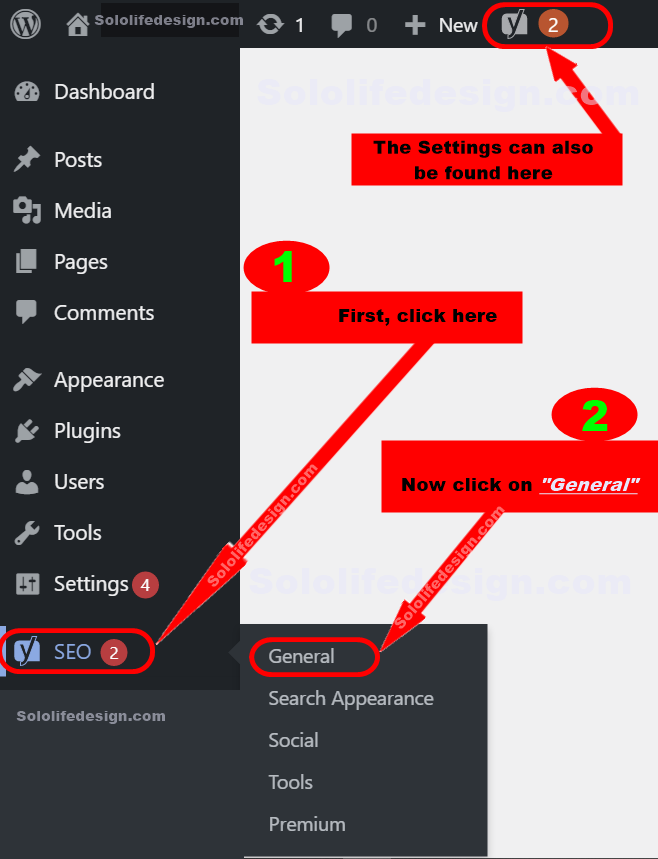
How to setup Yoast SEO on your website
On the Yoast SEO general setting page, you can make the configuration even easier by clicking on “Configuration Wizard“.
This configuration wizard will walk you through the necessary steps to finish your settings very simple.

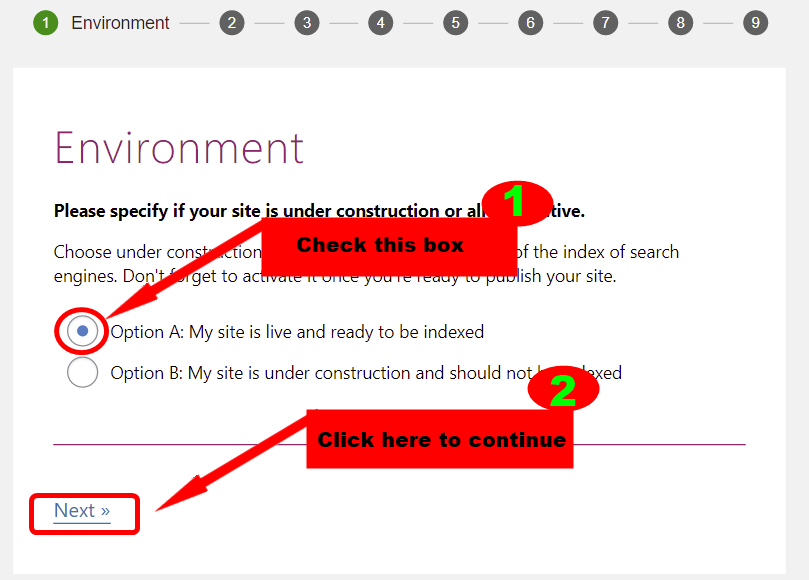
The first step is the “Environment” settings.
Here, you have to specify the stage of your blog. This tells search engines whether your website is ready to hit the internet or it’s just a new website and under development.
Although your blog is new and under development, let’s choose the first option and click “Next“.
Step 2:
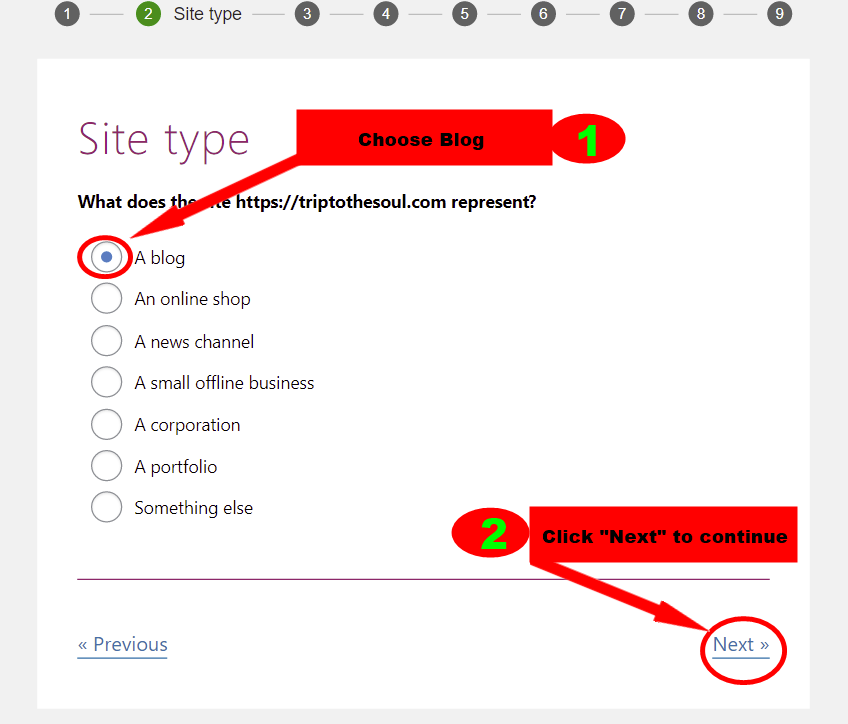
In this section, they want you to specify what type your website is. Simply choose “Blog” and click “Next“
Step 3:
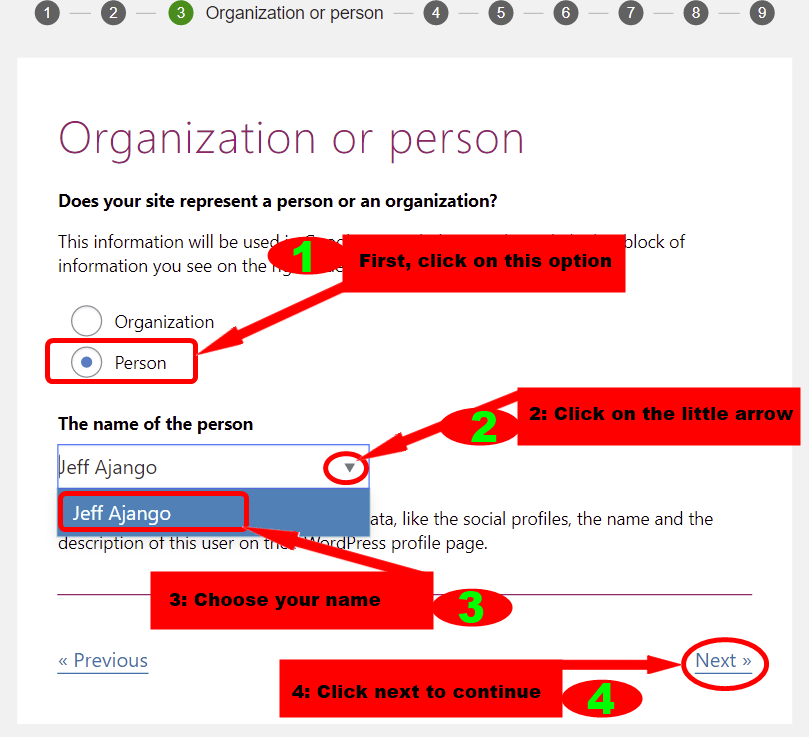
Set your website as an organization or an individual. So in your case, you will set yourself up as an individual because this is your personal blog website.
So choose “Person” and click “Next“.
!
Sometimes the Yoast SEO Plugin will automatically select your WordPress dashboard Username or nickname as your name. So if you can’t enter your name directly in the box, then click on the little arrow and choose any available name suggested by the Plugin.
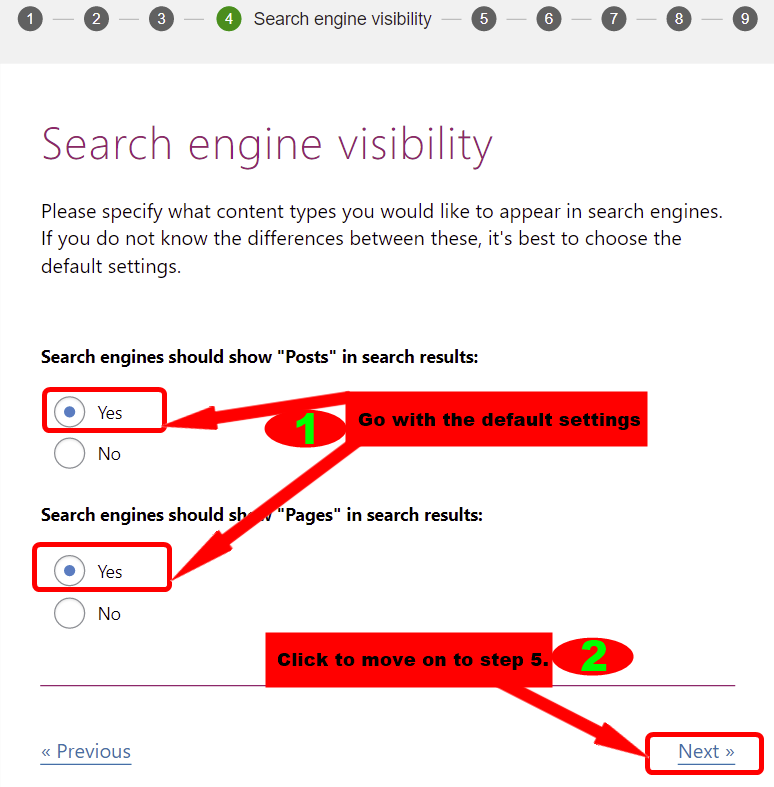
Step 4:
Here, we want to specify what content types should appear in search engines. In this section, the default setting is okay. So just click “Next” to continue.
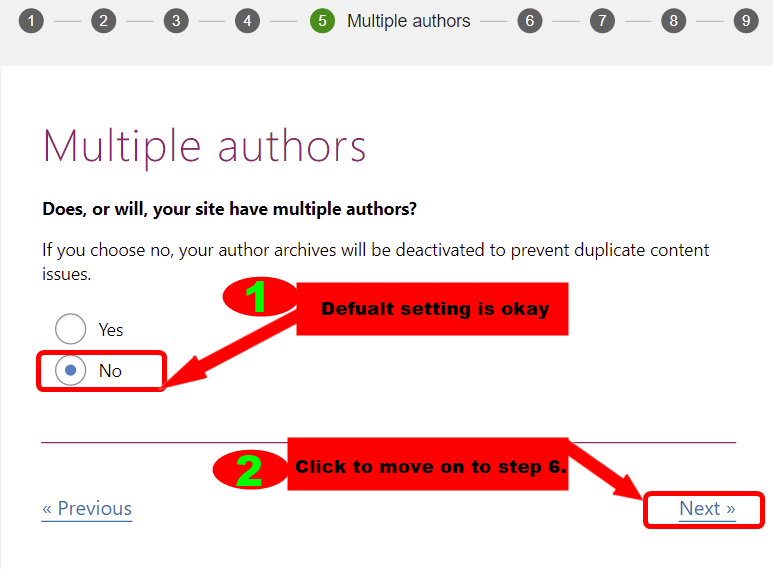
Step 5:
Here, you have to set the number of authors in your blog. You can go with the default settings because you can always return to this setting and add another writer whenever you want.
Step 6:
Now let’s set our blog title and the title separator. The title separator is a symbol used to separate your blog post’s title and your website’s name. You can go with the default settings.
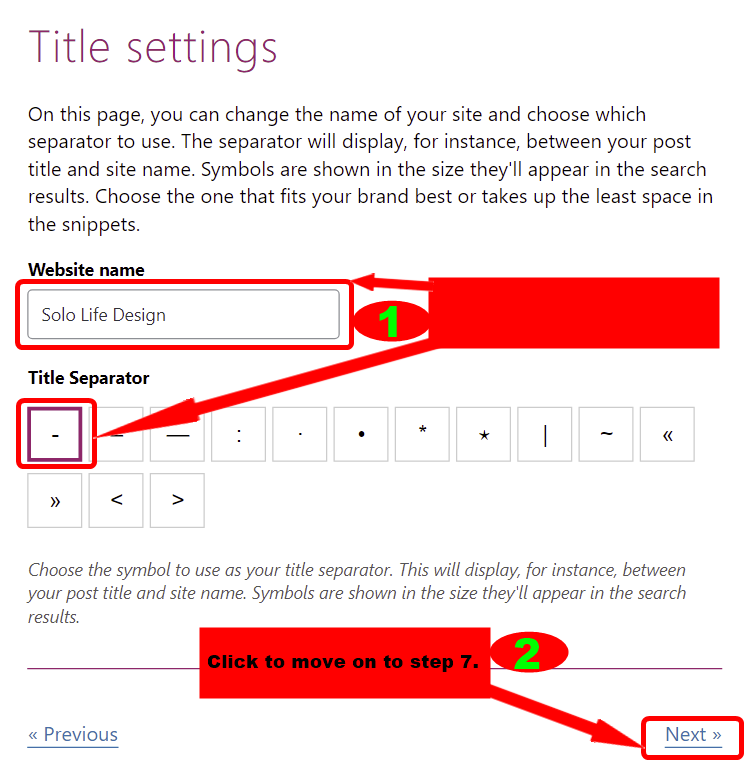
Step Seven and Eight are all up to you; you can choose whether to allow the Plugin take some data from your blog to improve user experience or not
In step Eight, you can sign up to learn more about the Yoast SEO Plugin and other valuable free videos. Step nine is just a success message and needs no action all.
Verifying domain ownership
Once you’re done with the first 9-step configuration wizard, the next important and final step is to verify your domain ownership. If your website or blog is already verified, you can forget about these.
You can verify your website with Baidu, Bing, Google or Yandex. It’s not necessary to verify with all of them; just choose one. I’m going to verify with Google.
To do this, simply go to the Yoast SEO general settings. Click on “Webmaster Tools“.
Next, click on “Google Search Console“.

Still on how to start blogging and make money. Don’t worry; we’re almost there. After you click on the “Google Search Console“, you should be taken to a page that looks like this image below.
!
Note: you will be taken to a new tab; don’t close the current tab or the “General – Yoast SEO” tab. You will come back to it later.
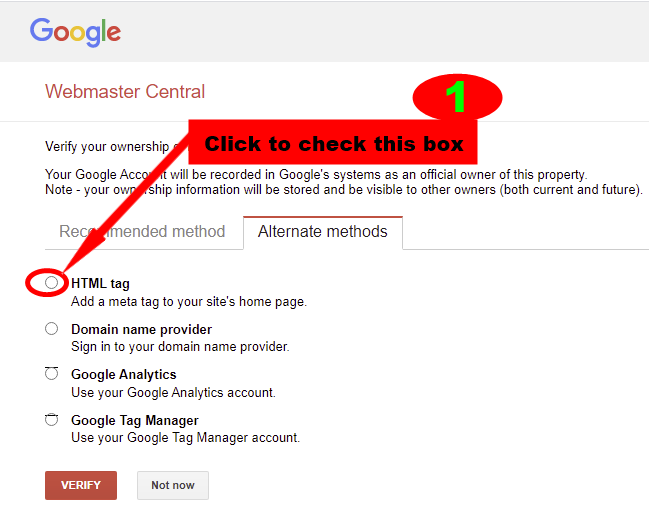
Once you select the “THML tag“, a new drop-down will appear with your search console meta code. Copy the alphanumeric string without the quotation marks.
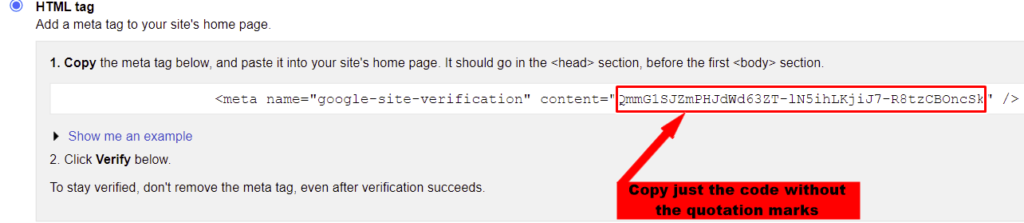
Now let’s go back to the “General – Yoast SEO” tab. Past the code in the “Google Verification code” box and click “Save changes“. see image below.
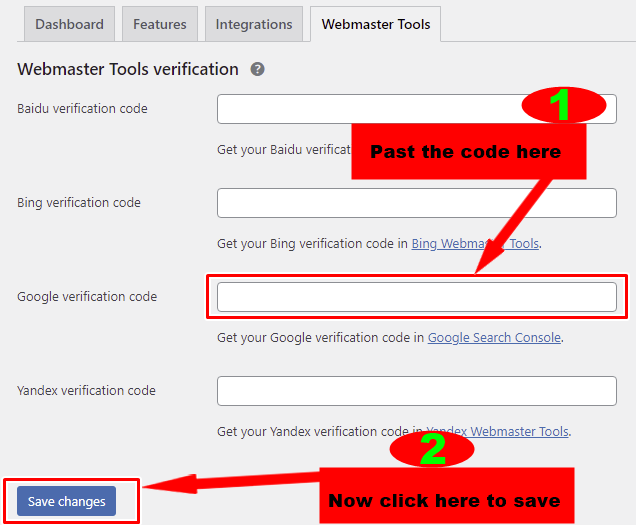
Finally, click the “Verify” button to finish the verification process.

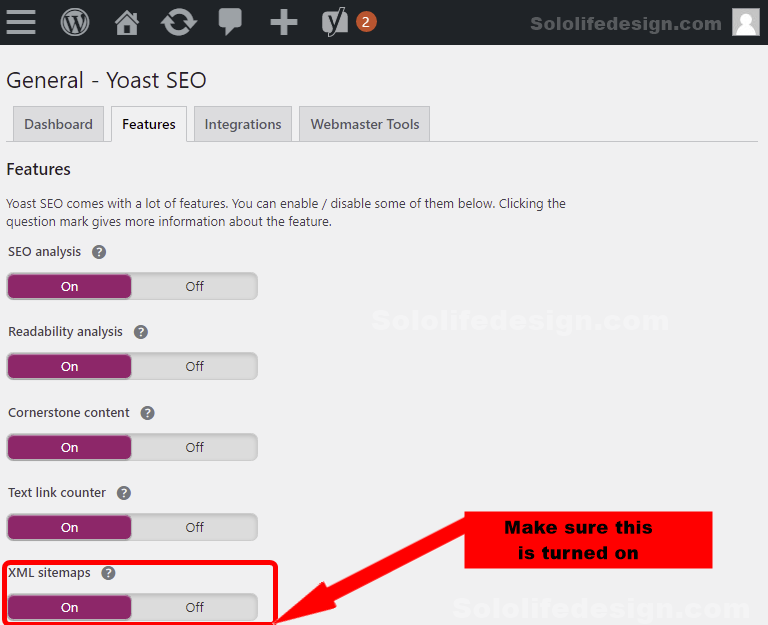
How to set up XML Sitemaps in Yoast SEO?
The next important thing we’re going to set for your blog is an XML Sitemap. What is an XML Site map? An XML Site map is a file that consists of all the URLs of a blog or website.
This file helps search engines like Google to crawl your blog for new posts and pages. The Yoast Plugin has a built-in feature that automatically updates your sitemap.
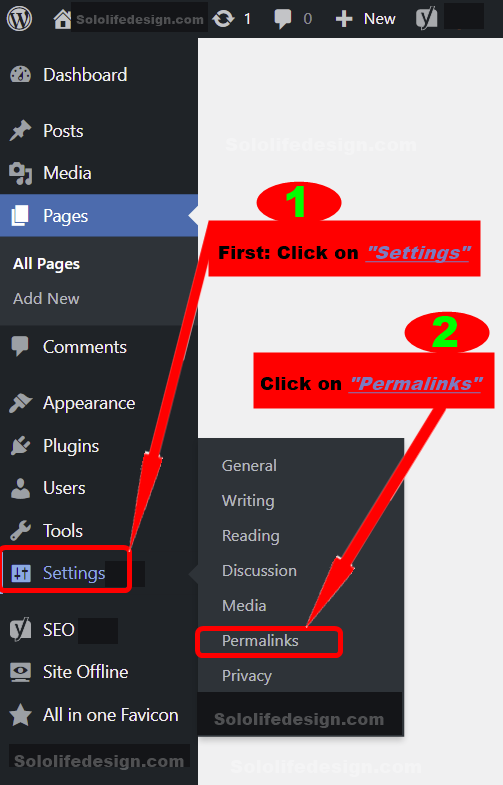
How to set up permalinks?
A permalink is a permanent link or URL to an individual weblog post. By default, WordPress sets your permalinks to yourdomain.com/postID. This is not helpful because it doesn’t help visitors understand what the page is about before visiting it.
So let’s fix that. First, head over to “Settings” in your WordPress dashboard sidebar. Click on “Settings” and click on “Permalinks” in the dropdown menu.
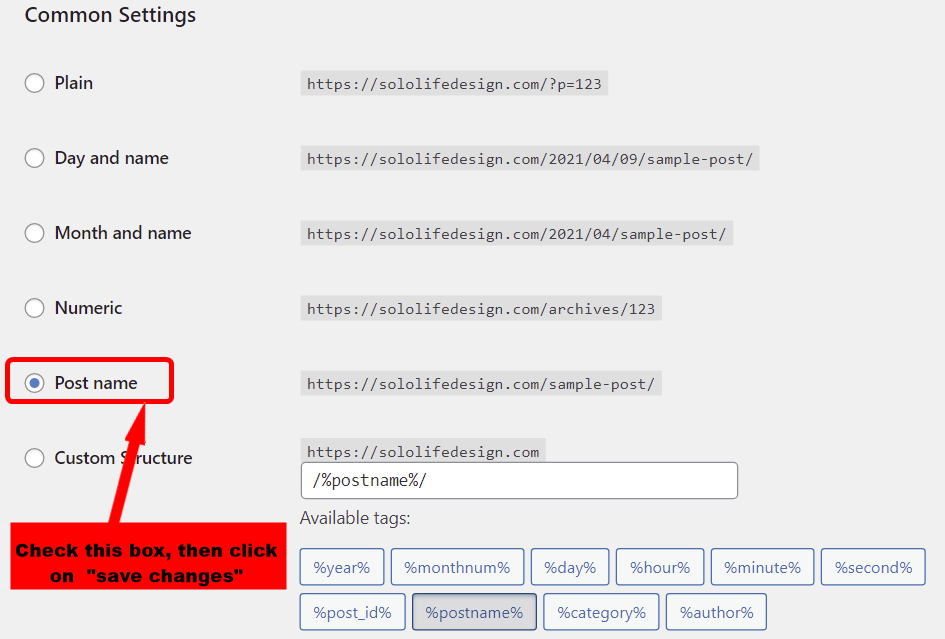
Choose “Post name” and scroll down to click “Save Changes“.
Put your blog offline while you’re working on it.
Congratulations my dear friend. We will start writing some blog posts and pages, but before we do that, we need to put your blog in maintenance or offline mode.
At this early stage your blog is empty. We don’t want visitors to visit the blog and see a mess. There’s a plugin that can allow us to hide the website from the public while we work on it at the back-end.
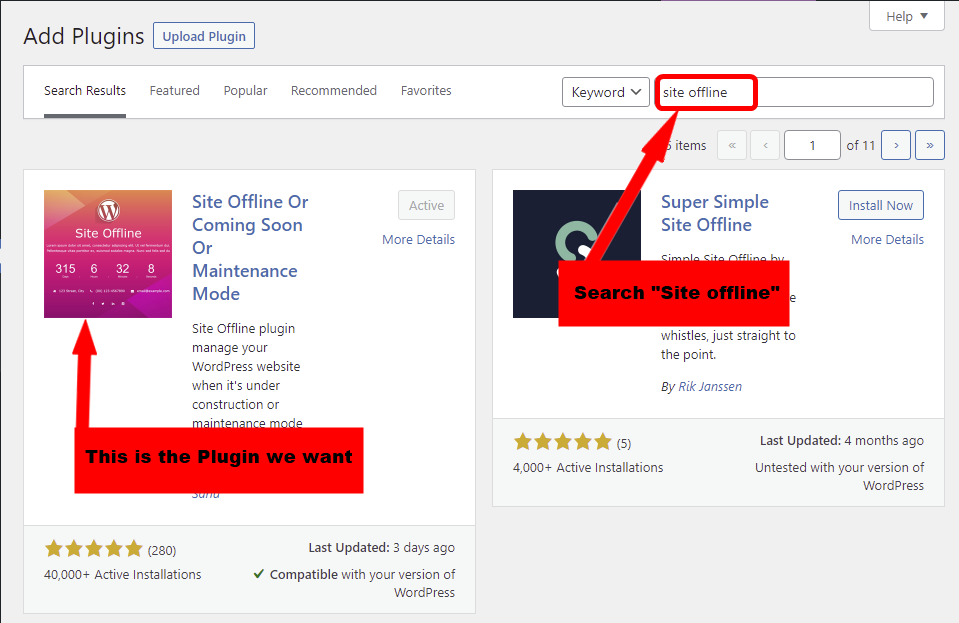
So head over to Plugins. I already showed you how to install a plugin so follow the same steps to the plugins store.
Once you’re in the Plugin store, search for “Site offline” and install it. I’ve already installed it. There are a few other plugins you can choose from, but I love this plugin “Site offline”
After you install the Plugin, it will be available through the sidebar menu. Simply click on it and go to its settings to enable it.
This Plugin allows you to add even contact info and a logo of your blog so anyone who visits your blog knows what’s going on.
You can display a nice message to visitors and let them know you’re working on your blog so they should check back later.
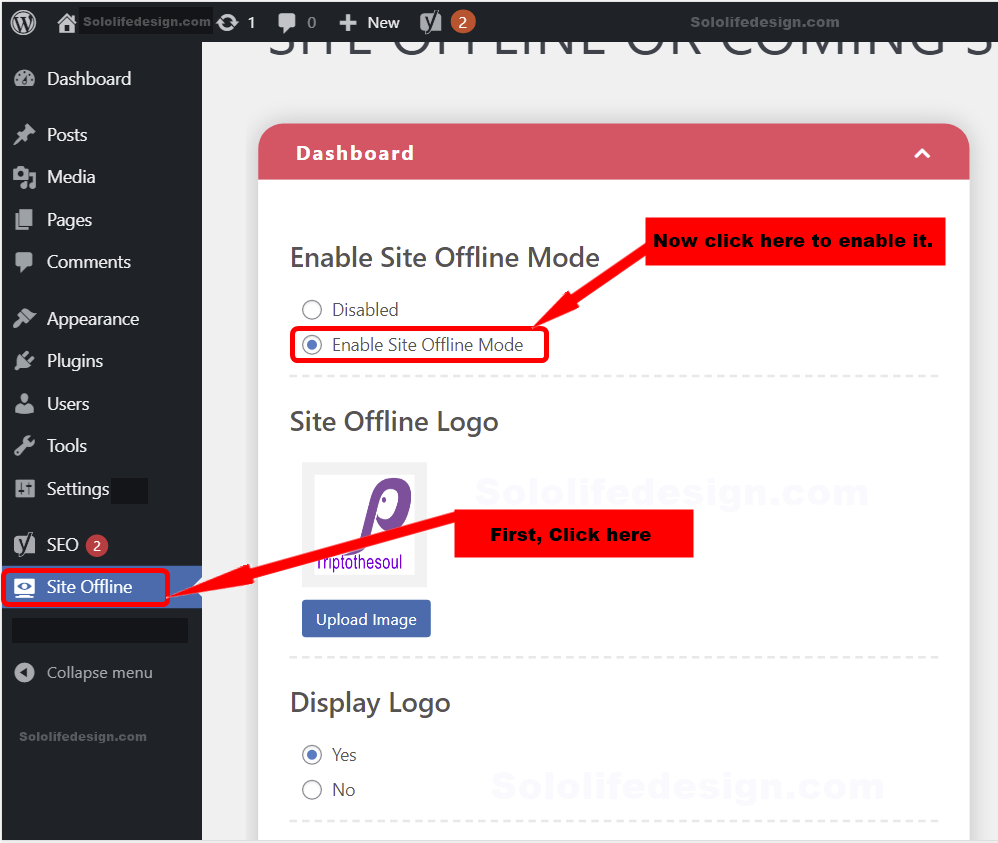
Open a new incognito window or visit your blog from a different browser. You will see that your blog is unavailable to visitors, but fully available to only you as an Admin.
Customize the page and style it the way you want. If you want a professional coming soon page with more features, check SeedProd
7. Write and publish your first blog
Your blog is now set up and ready for blog posts and content.
You need to decide which pages you want to add to your blog. Standard pages include About, Contacts, Products, or Services. It’s all up to you to decide if you really need any of those standard pages.
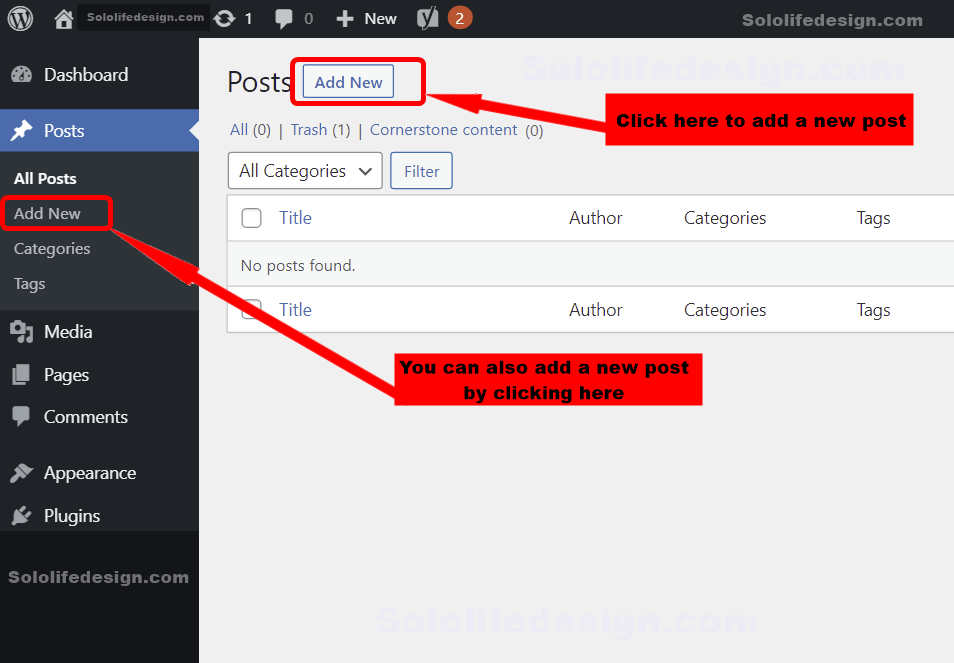
Creating a new page or blog post is almost the same procedure. Let’s write our first blog post. To create a new blog post, go to your sidebar and click on “Posts”. Now click on “All Posts” from the drop down menu to view all your posts.
Since your blog is fresh without any blog posts, there are no posts to view. To add a new post, click on “Add New“
You’ll be brought into the editor. This is where you can start creating all types of elements and contents.
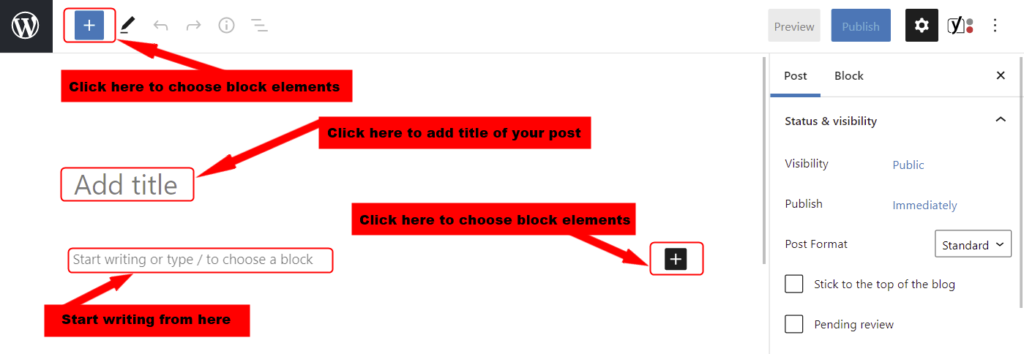
WordPress has got your back with all the Gutenberg blocks editors needed for creating content layouts. To see all the WordPress’s Gutenberg blocks, click on the ![]() at the top-left corner of your browser. This will pull down all the block elements available.
at the top-left corner of your browser. This will pull down all the block elements available.
In the “Add title“, type in the title of your blog post. Make sure your heading is catchy!. A catchy heading will draw more readers in.
How to add images to a blog
Images are very important when it comes to web design. So let’s add some few images to our blog!. Again, click on the ![]() to toggle the Gutenberg blocks.
to toggle the Gutenberg blocks.
Now, you want to look for “Image” from the blocks and click on it.

I’m not going to go into much detail about how to customize or style. This article is all about how to start blogging and make money the right way.
If you want to learn more about how to style a blog, read our full guide on advanced WordPress customization
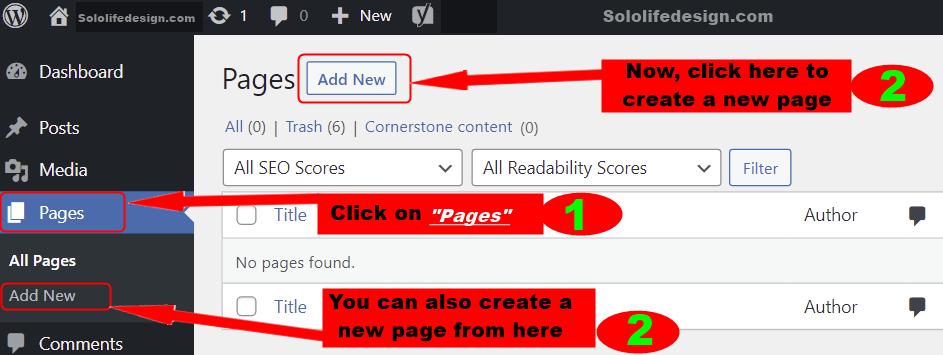
How to create a new page on WordPress.
Creating a new page is nearly the same as creating a new blog post. To create a new page, head over to your WordPress sidebar again and click on “Pages“
Now click on “Add New” either on the drop down menu or from the pages section at the right side of your browser. See image below.
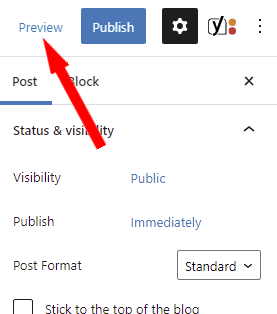
If you want to check how your blog look online, you can preview and make sure everything is ok before you publish.
So to preview your blog, locate “Preview” at the top of your browser window and click on it. If you’re OK with the design and everything is fine, simply click on “Publish” and “Publish” again (Two clicks on this button is needed).
If you ever need help, send us an email or text our WhatsApp line for assistance. I encourage you to play around with these blocks to make yourself comfortable with them. This is how we all got started so don’t worry, you will soon be there too!
8. Optimize your blog content for SEO
This article assumes you’re completely new so we will not leave anything behind. We will walk you through all the necessary steps needed to start a successful blog.
So what do we mean by SEO optimization and what is SEO?. Well Search engine optimization (SEO) is the process of promoting websites or blogs. This will help improve your content and increase the exposure of your blog.
There are so many different tactics and techniques you can use to achieve these results, but I don’t want to confuse you with advanced processes here.
Let’s go through some minimum settings to get our blog a simple SEO optimization.
Keyword optimization
So this is how to start a blog, but how do you actually show it to the world? How will people discover your blog? Though your blog is fully published on the Internet, almost nobody will visit it. This is because people don’t know your blog even exist.
The only people who know about your blog at this time are those who know your domain name. They can type your domain name directly in the browser and visit it. But is that how you got to my blog?
Perhaps no; you got to my blog by searching for “How to start blogging and make money” without entering my domain name “divpare.com”.
So my domain name is divpare.com, but you searched for how to start blogging and make money. How the heck then are you taken to my blog?
I created this article for people who are looking for how to start blogging and make money. We think of the problems of our visitors and what they need. We also try to guess what they will type in the search bar. So, we came up with the keyword “How to start blogging and make money” because we think you will search for that.
Search engines are getting smarter. When we search for something, search engines scan millions of websites or blogs. They will only show you all the list of blogs that has great content relevant to what you searched for. This is why SEO and responsive design is very important.
The process of creating great content for visitors and designing your website to be responsive on all devices is called SEO.
What exactly is a keyword?
Still not clear what a keyword is? A keyword, also known as focus keyword is a word that best describes the content of your blog posts or pages. These are the keywords you want to rank for. In other words, you want people to find your post or page on search engines when they search for your keyword.
Read this post for a complete understanding and know how to choose great keywords for your blog posts.
SEO meta tags
Ok, assuming your keyword is ready, where do you fix them in your blog? Any time you create and publish a new blog post or page, you need to add Meta Tags.
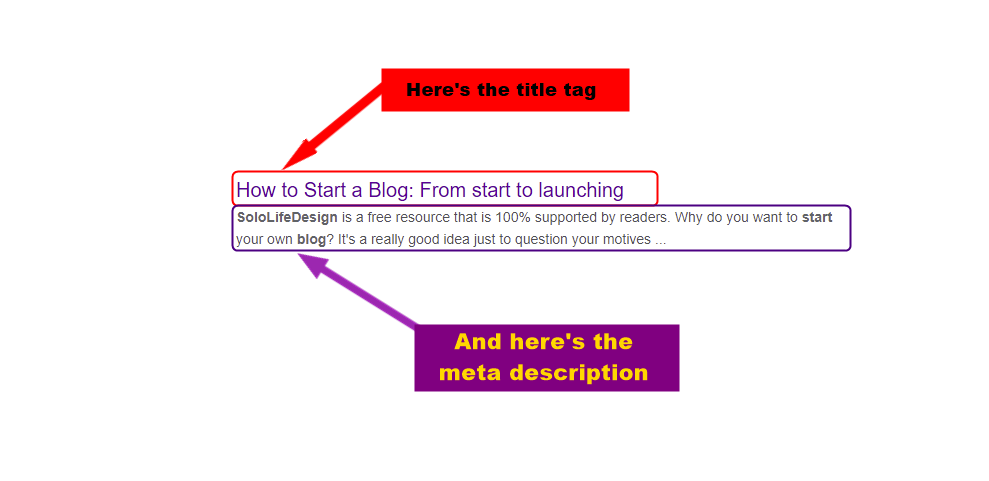
Few tags need to be created for each piece of content. These tags are called title tags and meta descriptions
Meta tags are purposely meant for Google and other search engines to better understand what the web page is about.
So, meta tags are very important for all posts or page because without them, your blog will never get ranked at all. Note that these tags will not be displayed by web browsers.
How do we create a meta tag?
So how do we create meta tags? Meta tags have to be set between the <head> and </head>. And the easiest way to set meta tags on WordPress is to use the YOAST SEO plugin or any other SEO plugin.
We have already shown you how to install this plugin so let’s start the optimization.
On the page you’re currently editing, scroll all the way down to the bottom of that same page. You will see the Yoast SEO configuration section that looks like the image below.
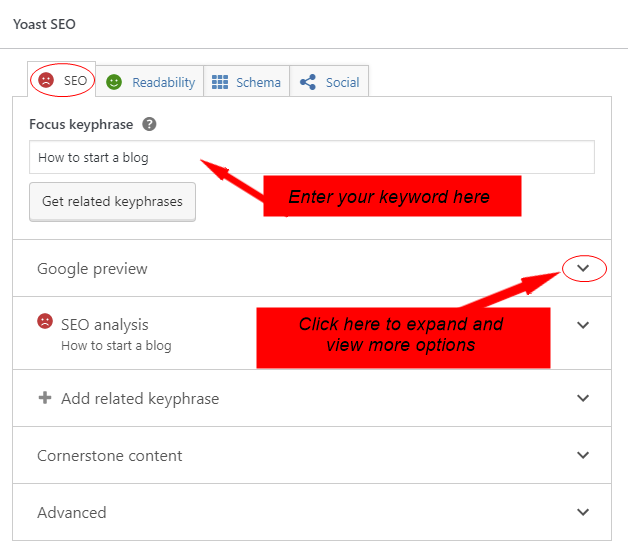
In the first box under “SEO“, enter your keyword below the “Focus key phrase”. The plugin will show you your progress as you make changes.
Once you’re done with the keyword, let’s now enter the meta description. To do so, click on “Google Preview”.
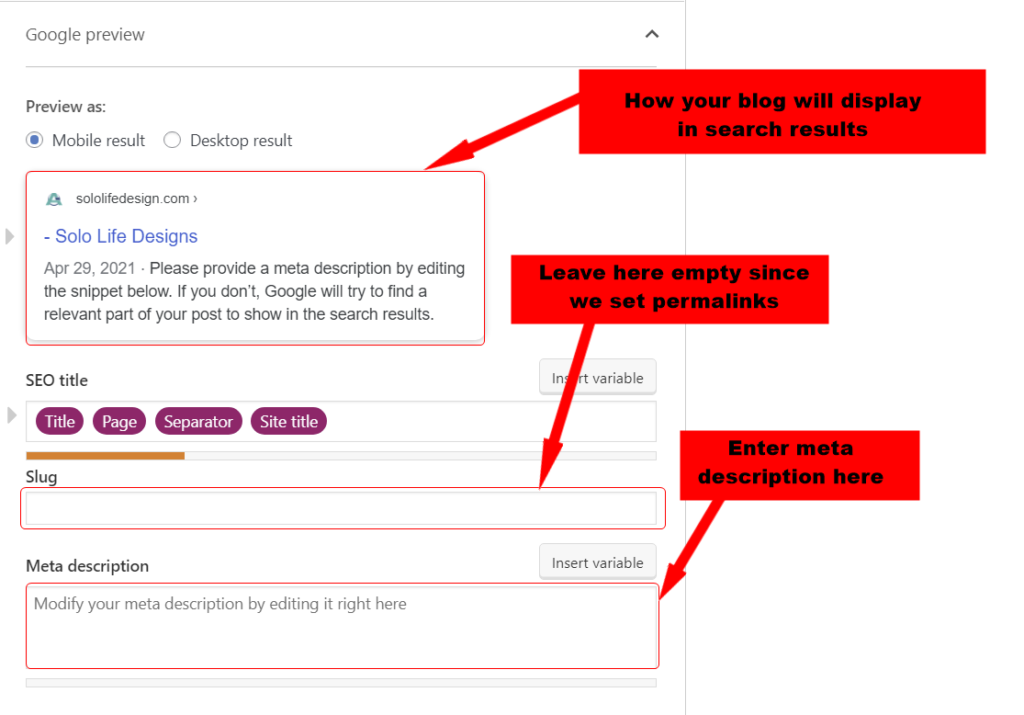
It will expand to show you how your blog will display in search results both on mobile and desktops. The last two input fields are where you enter the slug the meta description.
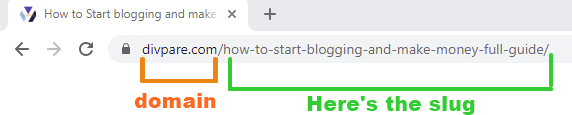
What is slug?
Anything that follows right after the domain name in a URL (Uniform Resource Locator) is what we call a slug. A slug generally describes a page or post in an easy to read form.
They give visitors more information about the page or post before they visit it.
Fortunately, you don’t have to worry about the slug. We have already set this part in the “Permalinks” so WordPress will automatically generate a slug for every page and post. So leave the slug box empty.
Below the slug box is the meta description. This is where you will write your meta description. Now as you make changes, you will notice that the plugin shows you your progress.
You will see red and green lights underneath every box with notifications.
Try as much as you can, to get more green lights for a better ranking. However, don’t over optimize.
In this article, we only want to show you how to start blogging and make money. However, we have gone that extra mile to show you how to configure your SEO meta tags. If you need more advanced settings and help, kindly contact us.
Finally, your blog is ready and now you have a clear idea of how to start blogging and make money. You have also learned how to create blog content and how to optimize SEO meta tags.
How to create great content for a blog.
Content is the heart of your blog when it comes to SEO. Without great, unique and relevant content, your blog will never be ranked and trust me, your great work is useless.
The number one reason why most new bloggers and websites fail is due to lack of quality content. Search engines want to serve visitors better with good relevant content.
Therefore, if you want to be found in search results, you have to do more with your content.
What do I mean by great content? Where and how do we get them?. Well, that’s a very short question, but there’s no a straightforward answer. If you wish to learn more about how I get my content without hiring content writers, read this article
9.Advance blog customization
The design of every blog is very important since it increases user interaction, which leads to a good ranking in search results.
I want to show you 3 best plugins I use on this blog and on my other blogs. All bloggers love them and I’ll tell you why.
If you have followed this step-by-step blog tutorial from the beginning, you may have noticed that so far your blog is not looking like mine, although I’m using the same theme and settings like I showed you.
The secret behind this is that I use a few powerful plugins for my blog customization. There are other free plugins out there that you can use, but to be honest with you, nothing good comes free of charge.
The three best drag&drop page builders.
These three drag and drop page builder plugins offers almost the same service. You don’t have to install all of them; just pick one that you like. I have multiple blogs so I have installed all of them on different domains.
They both have free versions, but I recommend you upgrade to premium so you can enjoy the full features.
WordPress comes with an editor, which is ideal for basic layouts and styling. If you want a full control over your site layout and style, there are three plugins to choose from
ElegantThemes, SeedProd and Elementor. Unlike the WordPress editor; you can easily speed up your blog design with these plugins as they have tons of free template which you can use to jump-start your work.
I’m using the premium version of Elementor on this blog, but I do have the ElegantTheme and SeedProd installed on my other blogs. Trust me, they make creating blogs super fast and fun.
With these plugins, you can create pages, posts or anything in just a minute because they already have some templates. Let’s say you want to create a contact us page; these plugins already have those templates which you can edit and customize them as you like.
Best plugin for backup.
UpdraftPlus
Backing up your blog is really very important because it could go down for several reasons. Or something can go wrong with your blog, especially if you don’t know what you’re doing.
Your blog could crash for many reasons and sometimes the only solution is to delete everything and start a fresh one. How hard is that?. I’ve found myself in this situation many times. Most of the WordPress plugins out there are very bad and could potentially crash your blog.
Thanks to Updraft-Plus; you can customize and work on your blog/website without having to worry about redesigning it from scratch again if anything goes wrong.
This plugin will regularly back up your files and keep a copy. Whenever there’s a problem with your blog, a simple button click will restore it back to where it was. With the premium version everything is done automatically.
The plugin will daily back-up your blog and even send a copy to your email or google drive so you don’t need to login to your dashboard and manually do the back-up. Learn more about Updraft here
10. How to start blogging and make money?
So this is how to start blogging and make money. But how do we make money from blogging?
There are many ways you can successfully monetize your blog; none of which unfortunately is a get-rich-quick. However, as long as you’re willing to put in the hard work and commitment, the sky is your limit!
Here are some proven ways to make money from your blog.
1. Affiliate Marketing

Affiliate marketing is the way of earning money by getting visitors from your blog to buy other people’s products. This is done by reviewing or recommending your favorite products or services to your readers.
Whenever someone from your blog makes a purchase, you get a referral commission. All you have to do is to recommend high-quality products and services that you already use and trust.
Sometimes people want to buy products or services, but they want to know more about what they’re paying for.
Sign up for affiliate programs and get your affiliate links which you can use on your blog.
2.Google AdSense
Google Adsense is another monetization channel for blogs. You can run ads that are specific to what you are writing about on each post or page of your blog regardless of your niche.
To get started, you can simply sign up with Google AdSense or AdThrive.
2.Selling your products and services
You can make money from your blog by selling your own products or services if you’re creative. You can also sell videos, books, cards and so on.
Conclusion
Congratulations! This is how to start blogging and make money. You have successfully created your own blog. How soon you can earn money from your blog depends on how committed you are posting high-quality content.
You don’t want to spend money hiring developers anytime you want to install a plugin or make some little changes to your blog.
I recommend you familiarize yourself with the WordPress dashboard to better understand and start working on your blog by yourself.

About Me
Hello! My name is Jeff! I’m a full-time blogger! And I must say I love every moment of it because sharing things is my game. With over seven years of experience in the blogging industry, I love to share my experience with the world and work closely with anyone who needs a guide.

I used to be able to find good advice from your articles.
Hey would you mind letting me know which hosting company you’re utilizing? I’ve loaded your blog in 3 completely different web browsers and I must say this blog loads a lot faster then most. Can you suggest a good web hosting provider at a fair price? Kudos, I appreciate it!
Hi thank you for visiting!
Concerning your question, a website loading speed sometimes has nothing to do with the hosting company.
You can host your website at your visitors door-step or on the most fastest web server, but if your site is not well optimized, it’s going to take longer to load.
I’ve been receiving a lot of emails asking me the same question.
Here’s how I setup my website:
I’m using the Astra theme, but I deleted 65% of the default theme’s files including all CSS and almost all scripts. (DO NOT TRY THIS) Unless you know what you’re doing
I limited the number of plugins on the site to only 6 plugins.
Instead of installing multiple plugins, I went for this supper multi-purpose plugin
The plugin allows you to:
1. Add custom HTML, CSS, JavaScript and PHP to your site
2. Limit your site login attempts or hide the login page
3. Integrated google speed insight. Test your site speed, performance, SEO issues with suggestions
5.Custom header and footer
6. Make column clickable
7. Custom free AL Chatbot with real-time email notification
I’m also using CSS-sprite to load my images and limit the HTTP requests.
Here’s where I host my websites
Feel free to drop me a message if you need any help.
Amazing! This blog looks just like my old one! It’s on a totally different topic but it has pretty much the same layout and design. Great choice of colors!
I’m glad you love it.
Kindly let me know if there’re any suggestions .
Thanks for visiting
Hi do you want to work with us online?
I noticed from your other blog website that you’re a freelance.
I love the way you customize this site. We have sent you so many emails, but you never reply.
I think this is among the most vital info for me. And i am glad reading your article. But wanna remark on some general things, The website style is ideal, the articles is really great : D. Good job, cheers
Thanks for visiting! I’m glad you found it helpful.
You can always contact me by email or through my whatsapp number if you need any help with your site. I will be more than happy to help and share my experience with you.
Have a great time.
This is a topic that is near to my heart… Many thanks! Where are your contact details though?
I’m happy you found this article useful.
You can text our whatsApp number: +1 814 499 1190
or send an email to [email protected]
Thus, FGFR1 amplification may be enriched in recurrent or metastatic ILC buy cialis online using paypal
Very nice article, exactly what I wanted to find.
Thank you for the auspicious writeup. It in fact was a amusement account it. Look advanced to more added agreeable from you! However, how can we communicate?
I’m glad you found this article helpful.
The best way to reach me is through my email address….. [email protected]
Stay safe.
This post is worth everyone’s attention. Where can I find out more?
Thanks on your marvelous posting! I really enjoyed reading it, you can be a great author.I will be sure to bookmark your blog and will often come back later in life. I want to encourage yourself to continue your great work, have a nice weekend!
Hey just wanted to give you a brief heads up and let you know a few of the pictures aren’t loading properly. I’m not sure why but I think its a linking issue. I’ve tried it in two different internet browsers and both show the same results.
Hello
Thanks for your comment to draw our attention about the issue on the site.
We are currently making some few changes to the site including the layout and how images are served.
We’re aware of the issue and we are working at the speed of light to get everything fix as soon as possible.
Sorry for any inconvenience caused.
Thanks for visiting and letting us know about the error.
Stay safe.
where can i get dexamethasone
clonidine brand name in india